🎉  Userflow joins forces with Beamer to create all-in-one growth toolkit

Read more
blog single image
blog single image
Userflow Updates

Multi-environment support

blog author
Sebastian Seilund

April 9, 2020

You can now run multiple environments - such as Production and Staging - under the same Userflow account. This makes it possible to test flows in your Staging environment before publishing them to Production.

Setting up environments

All Userflow accounts start out with a single environment, named "Production". Under Settings -> Environments, you can add additional environments, such as "Staging".

Once you add an extra environment, you'll see a new Environment menu in the top right, which you can use to switch between your environments:
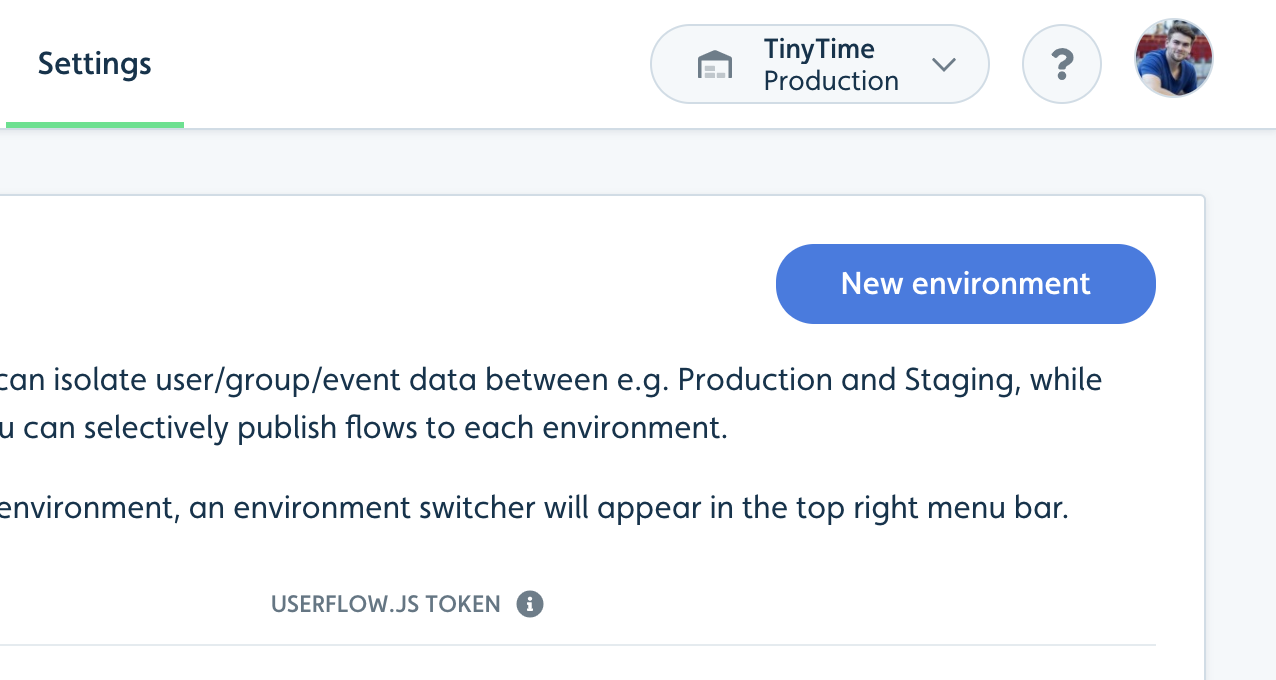
Environment switcher

Each environment has its own Userflow.js Token (the one you supply to userflow.init()) and its own API keys.

Isolated user data

User data, including events and flow sessions, are completely isolated between environments. This means that your Staging users will not interfere with your Production analytics.

When you look at e.g. the Users tab, it'll only show users in the currently selected environment.

Publish flows to individual environments

Flows, on the other hand, are shared between environments. If you have multiple environments, you can publish a flow to specific environments only. When you click Publish in the Flow Builder, you'll now see this:
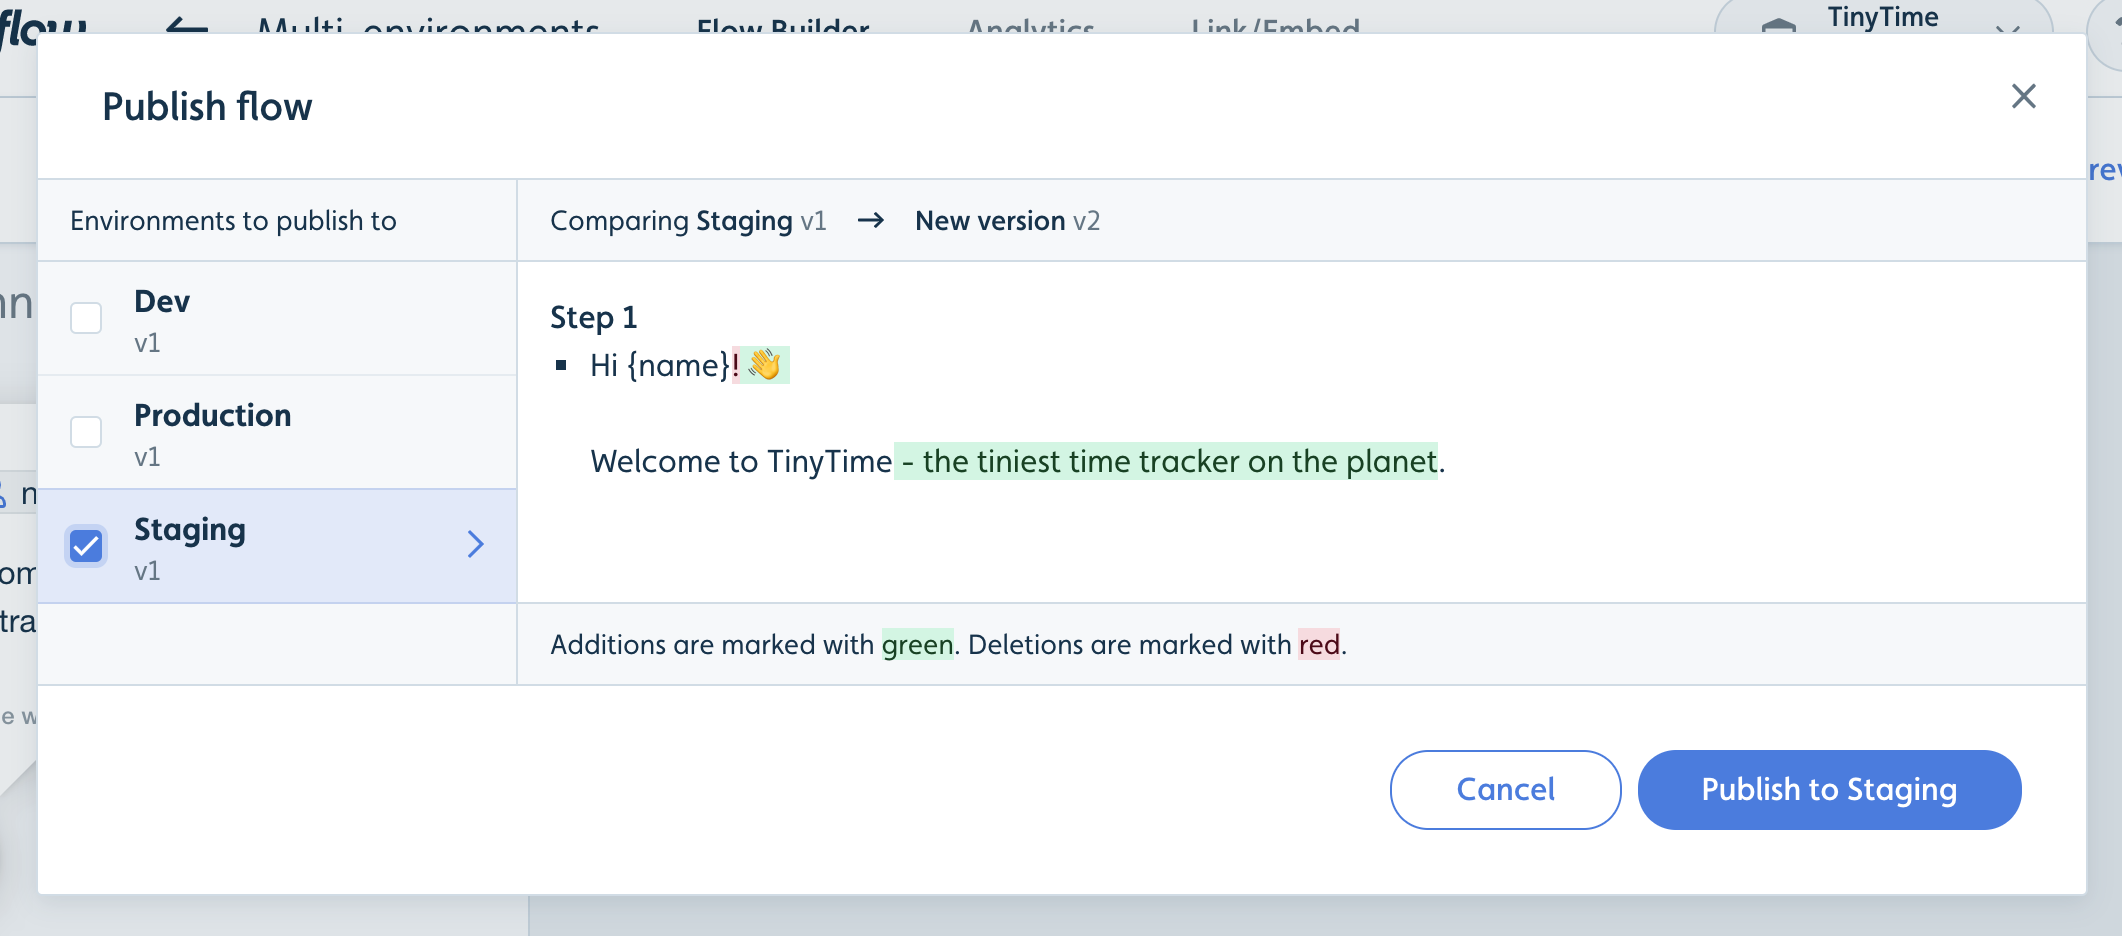
Publish dialog

Simply check the checkbox next to each environment you want to publish to. Unchecked environments will stay on their current version.

Example use case:
Test in staging before publishing to production

  1. Create a new flow.
  2. Add some content to it.
  3. Click Publish in the Flow Builder to open the publish flow dialog. Check only your Staging environment. Click Publish in the dialog footer.
  4. Go to your staging environment (in your own app) and try out the flow.
  5. Optionally, repeat steps 2-4 as necessary.
  6. Once you're happy with your flow, click Publish in the Flow Builder again. Now also check Production. Click Publish in the dialog footer.
  7. Your real production users can now see the flow.

2 min 33 sec. read

blog single image
Userflow Updates

Multi-environment support

blog author
Sebastian Seilund

April 9, 2020

You can now run multiple environments - such as Production and Staging - under the same Userflow account. This makes it possible to test flows in your Staging environment before publishing them to Production.

Setting up environments

All Userflow accounts start out with a single environment, named "Production". Under Settings -> Environments, you can add additional environments, such as "Staging".

Once you add an extra environment, you'll see a new Environment menu in the top right, which you can use to switch between your environments:

Environment switcher

Each environment has its own Userflow.js Token (the one you supply to userflow.init()) and its own API keys.

Isolated user data

User data, including events and flow sessions, are completely isolated between environments. This means that your Staging users will not interfere with your Production analytics.

When you look at e.g. the Users tab, it'll only show users in the currently selected environment.

Publish flows to individual environments

Flows, on the other hand, are shared between environments. If you have multiple environments, you can publish a flow to specific environments only. When you click Publish in the Flow Builder, you'll now see this:

Publish dialog

Simply check the checkbox next to each environment you want to publish to. Unchecked environments will stay on their current version.

Example use case:
Test in staging before publishing to production

  1. Create a new flow.
  2. Add some content to it.
  3. Click Publish in the Flow Builder to open the publish flow dialog. Check only your Staging environment. Click Publish in the dialog footer.
  4. Go to your staging environment (in your own app) and try out the flow.
  5. Optionally, repeat steps 2-4 as necessary.
  6. Once you're happy with your flow, click Publish in the Flow Builder again. Now also check Production. Click Publish in the dialog footer.
  7. Your real production users can now see the flow.

2 min 33 sec. read

You can now run multiple environments - such as Production and Staging - under the same Userflow account. This makes it possible to test flows in your Staging environment before publishing them to Production.

Setting up environments

All Userflow accounts start out with a single environment, named "Production". Under Settings -> Environments, you can add additional environments, such as "Staging".

Once you add an extra environment, you'll see a new Environment menu in the top right, which you can use to switch between your environments:

Environment switcher

Each environment has its own Userflow.js Token (the one you supply to userflow.init()) and its own API keys.

Isolated user data

User data, including events and flow sessions, are completely isolated between environments. This means that your Staging users will not interfere with your Production analytics.

When you look at e.g. the Users tab, it'll only show users in the currently selected environment.

Publish flows to individual environments

Flows, on the other hand, are shared between environments. If you have multiple environments, you can publish a flow to specific environments only. When you click Publish in the Flow Builder, you'll now see this:

Publish dialog

Simply check the checkbox next to each environment you want to publish to. Unchecked environments will stay on their current version.

Example use case:
Test in staging before publishing to production

  1. Create a new flow.
  2. Add some content to it.
  3. Click Publish in the Flow Builder to open the publish flow dialog. Check only your Staging environment. Click Publish in the dialog footer.
  4. Go to your staging environment (in your own app) and try out the flow.
  5. Optionally, repeat steps 2-4 as necessary.
  6. Once you're happy with your flow, click Publish in the Flow Builder again. Now also check Production. Click Publish in the dialog footer.
  7. Your real production users can now see the flow.

About the author

Co-Founder of Userflow

Sebastian Seilund is the co-founder and former CEO of Userflow, where he built one of the leading user onboarding platforms for SaaS companies. With experience as a software engineer at Google and having founded multiple successful software companies, including Denmark's first user-friendly accounting software, Sebastian brings deep technical expertise to discussions about product-led growth and user experience.

Effortless Onboarding,
Powerful Results

Try the most-loved user onboarding product on the market.

CASE STUDIES

All case studies
iconicon

Evocalize

a case study

How Evocalize Boosted Product Adoption and Engagement With Userflow 

Learn how
iconicon

Visma Dinero

a case study

How Visma Dinero provides 24/7 onboarding and support with in-app content and AI Assistant.

Learn how
iconicon

Iteratively

a case study

How Iteratively gives users an awesome first-time experience

Learn how
iconicon