AI Assistant delivers automated answers to your users’ questions within your app, leveraging your knowledge base and website, and powered by the latest large language models (LLMs).
Waiting for answers means wasted time for users. The AI Assistant provides instant, accurate answers through a convenient chat interface, offering users a superior experience compared to traditional search methods. This also frees up time for your support team to focus on the most crucial cases.
Setting up the AI Assistant is a breeze. Simply input your website URL and within minutes, you’ll have a fully functional AI support agent.
How the AI Assistant works
You create an AI Assistant using the Userflow UI, just like any other content. Specify the location of the source information, such as your website, knowledge base, or help center.
Userflow then trains your assistant based on this information, enabling it to answer questions related to topics and details found within your content. It’s as if a human with perfect memory had read your entire knowledge base.
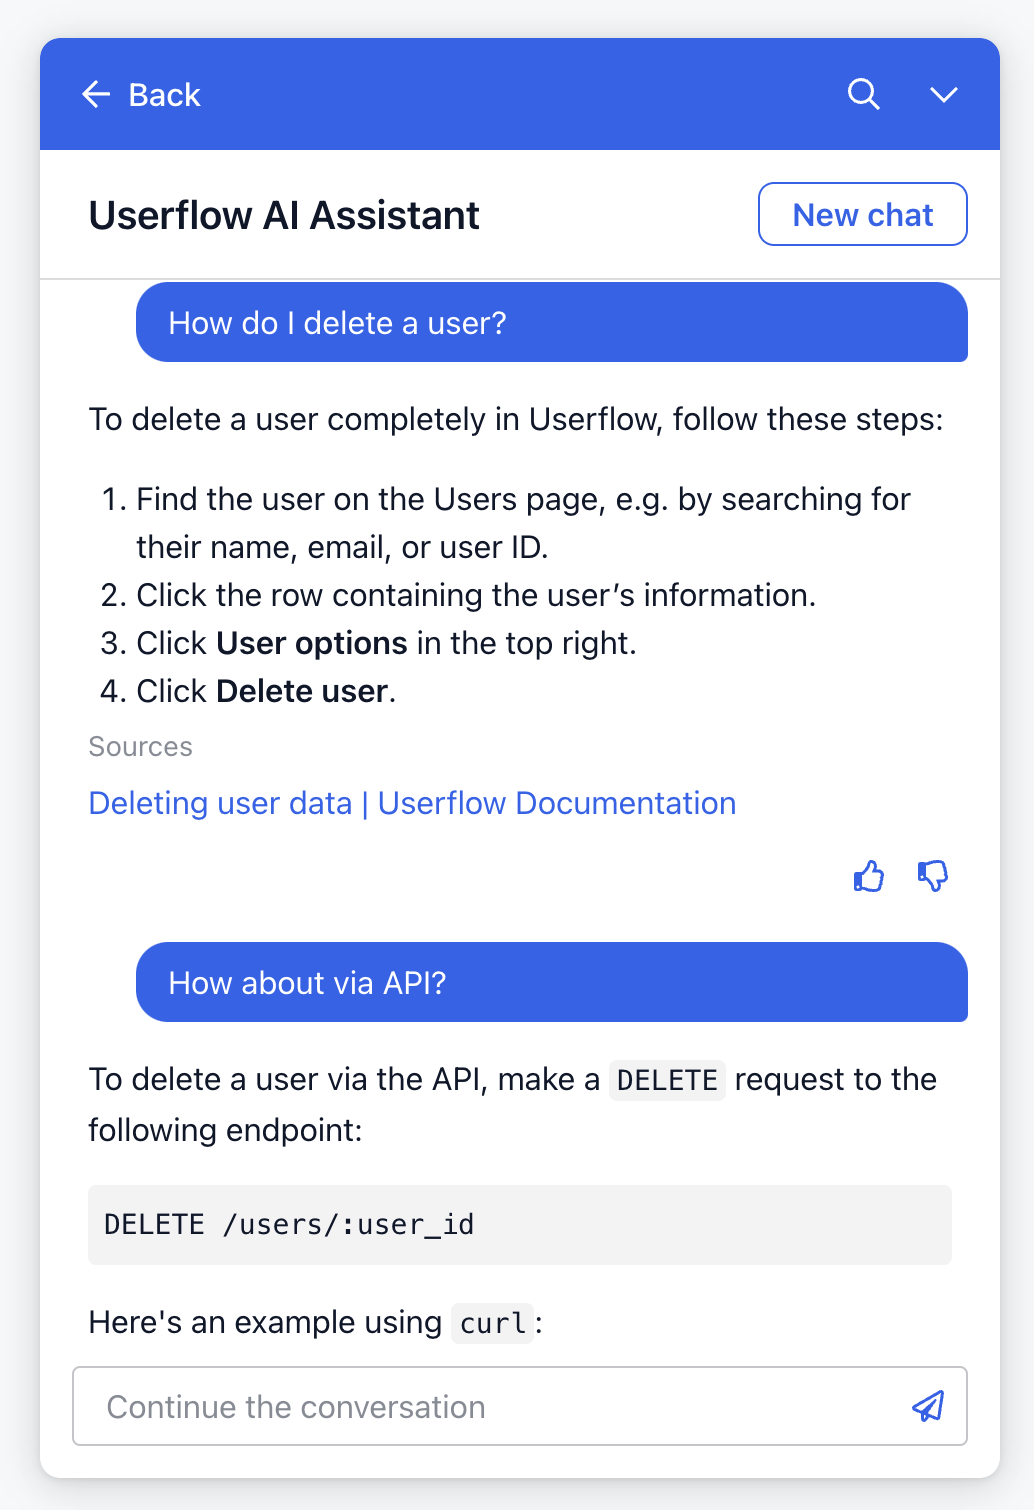
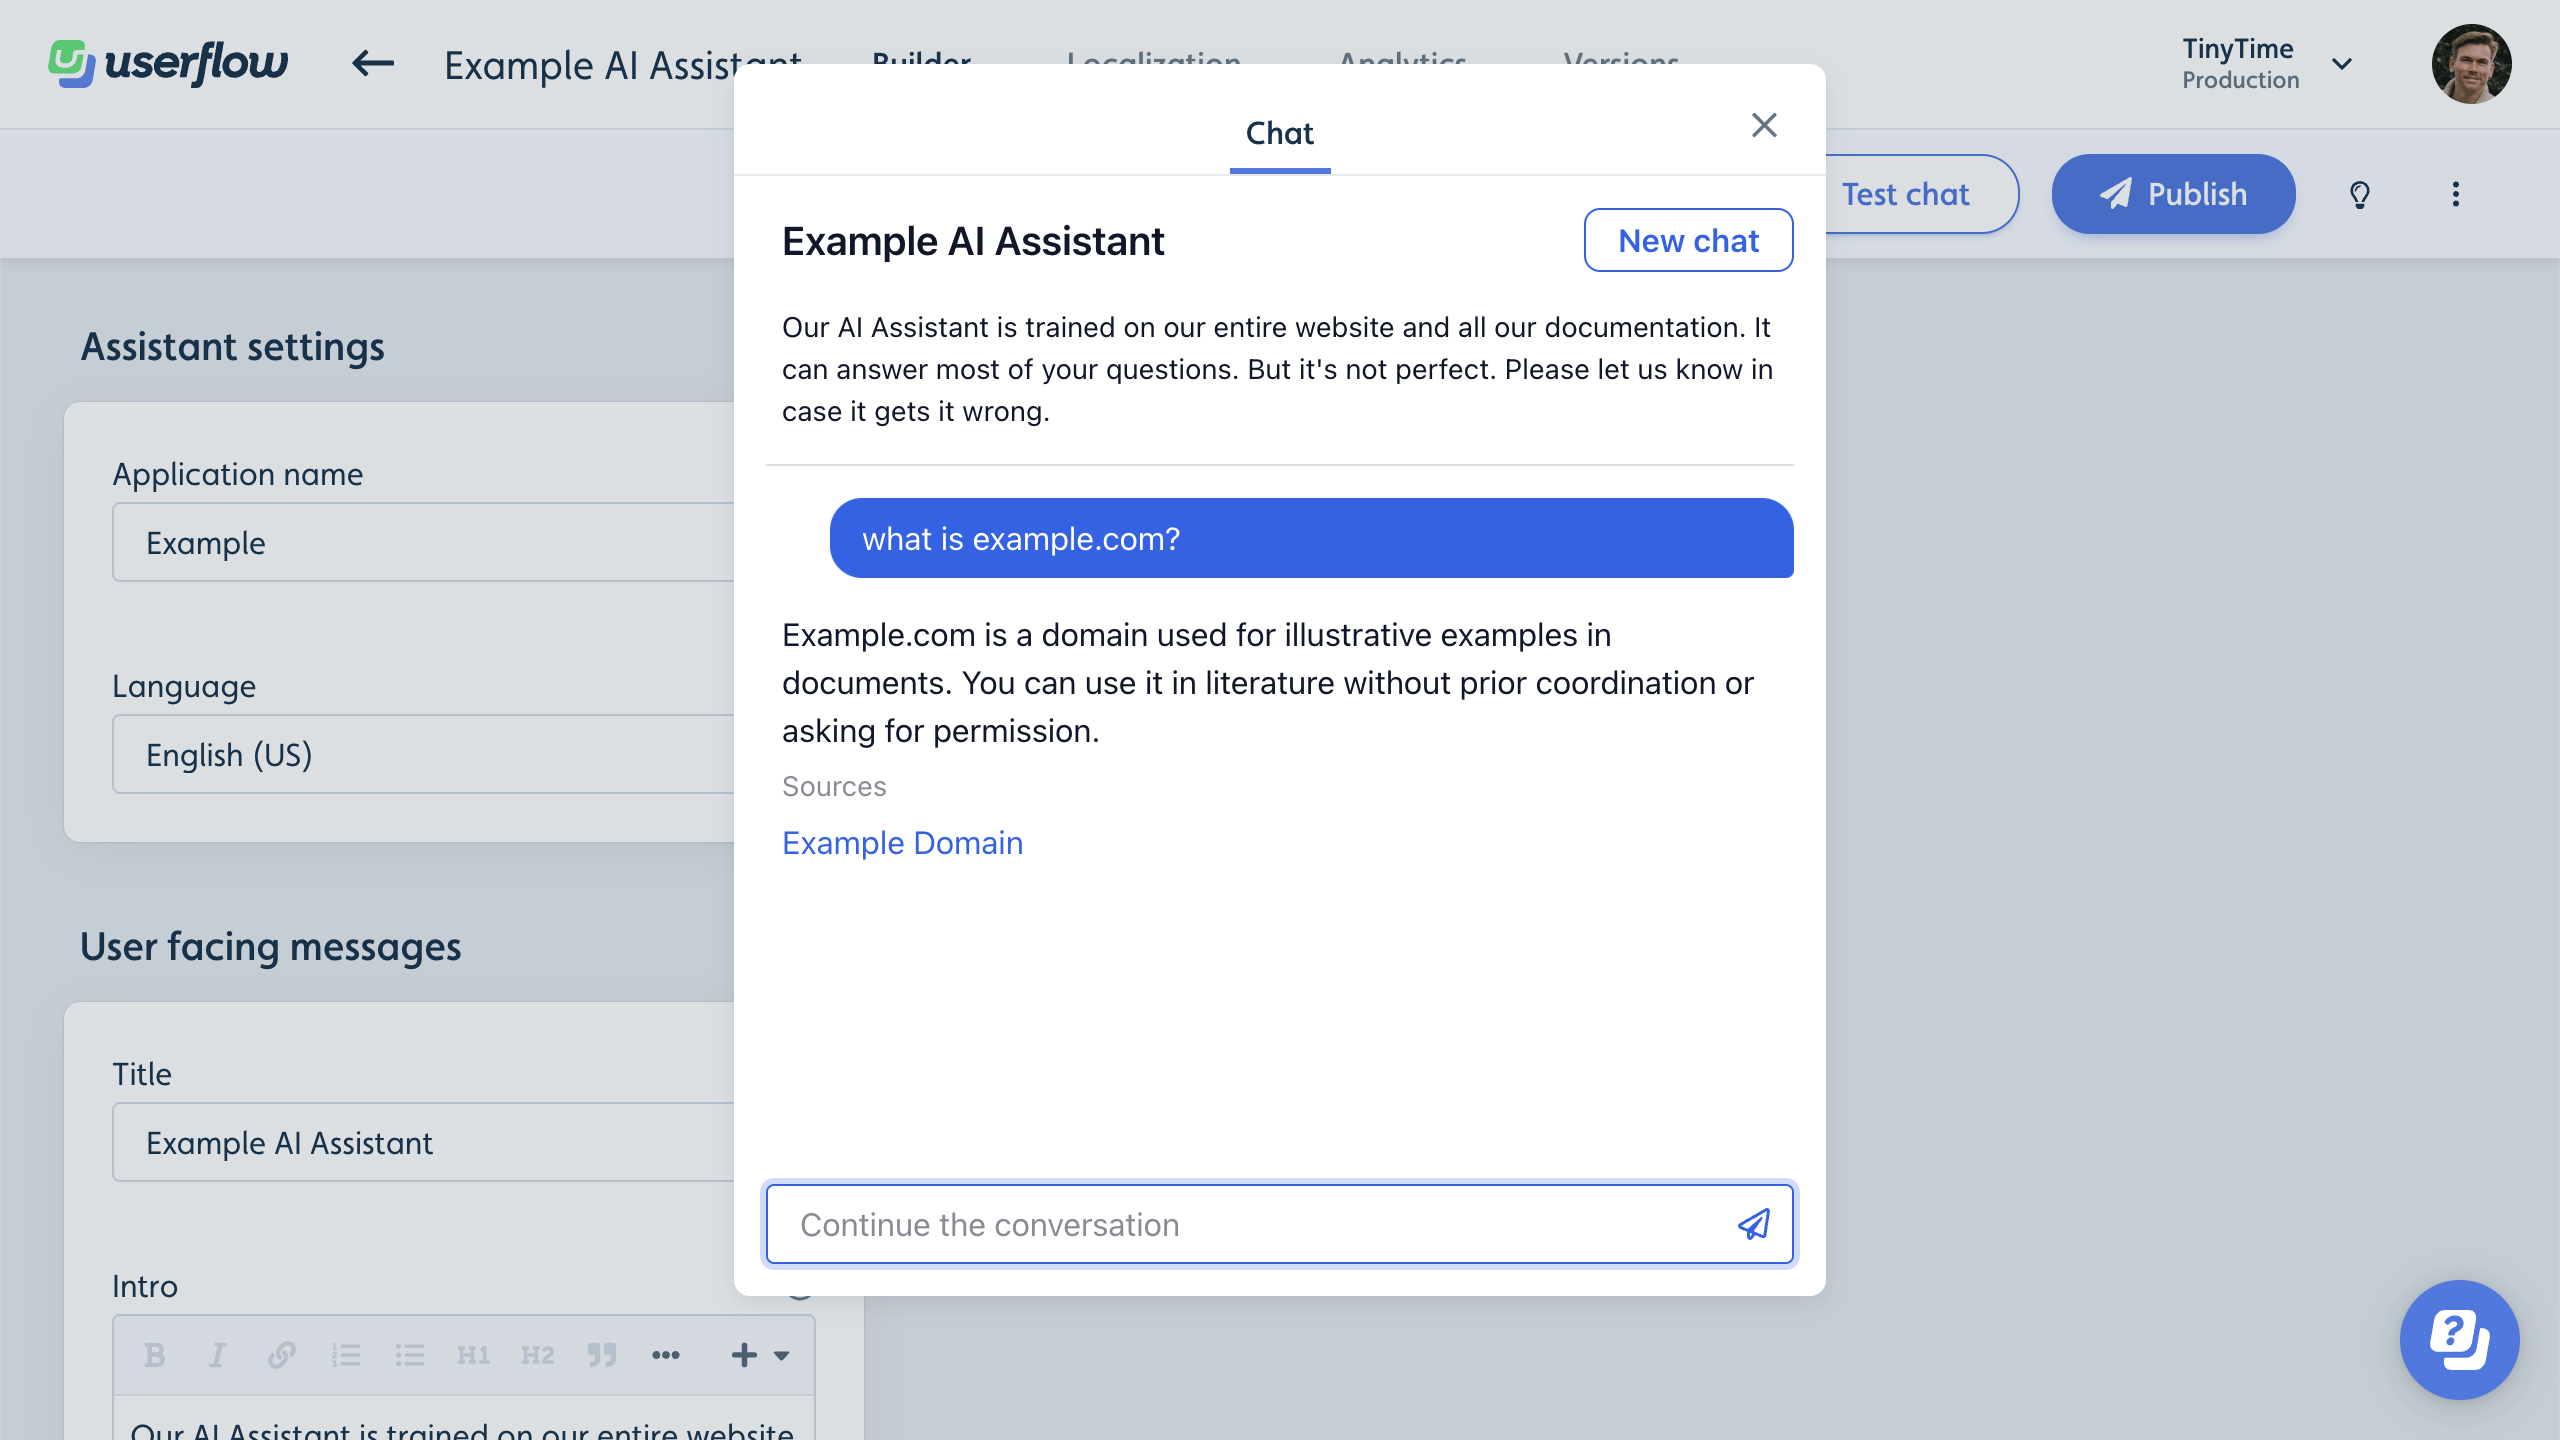
The assistant resides in your resource center, allowing users to access it via the help icon in the corner of your app (or your custom resource center launcher, if using).
The assistant considers the chat history when answering questions, enabling users to ask follow-up questions.
Pricing
AI Assistant pricing is based on the number of messages sent by users per month. Each pair of a user’s question and the assistant’s answer counts as 1 message.
Each plan includes a certain number of messages per month. Additional bundles of 500 messages/mo will automatically be added to your subscription at $100/mo. See pricing
Managing costs with message limits
To help manage costs, you can set daily and monthly message limits for your AI Assistant. These limits give you control over usage, ensuring you stay within your desired budget.
How message limits work:
Max. messages per month for the environment (across all users)
Default: Unlimited
Custom limit: Set a limit to control usage
The number of messages sent to the assistant in an environment is tracked within a cycle determined by your subscription’s end date. A cycle is a one-month period starting on the day of the month corresponding to the end of the subscription period. For instance, if your subscription ends on the 15th of a month, your message limit cycle would run from the 15th of one month to the 15th of the next month.
Monthly usage checks are conducted at regular intervals. It’s possible for usage to exceed the set limits between such checks. Please be aware of potential overages and their implications as explained above.
When the limit is reached
The assistant will remain hidden in the resource center until the beginning of the new cycle or you update the limits.
Account owner will receive an email notification when the assistant is disabled.
There may be a brief delay (up to 10 minutes) in both hiding the assistant after reaching the limit and restoring visibility at the beginning of the new cycle.
The limit does not apply to messages sent in test chat.
The limit applies to messages sent to the assistant while previewing a resource center
Max. messages per user per day
Default: 200
Max: 1,200
The number of messages a user sends to the assistant is tracked over the last 24-hour period to determine when to enforce the limit
When the limit is reached, the user will not be able to submit new messages. They will see an error informing them that they’ve reached their daily limit
Ensure your latest assistant message limits are published. 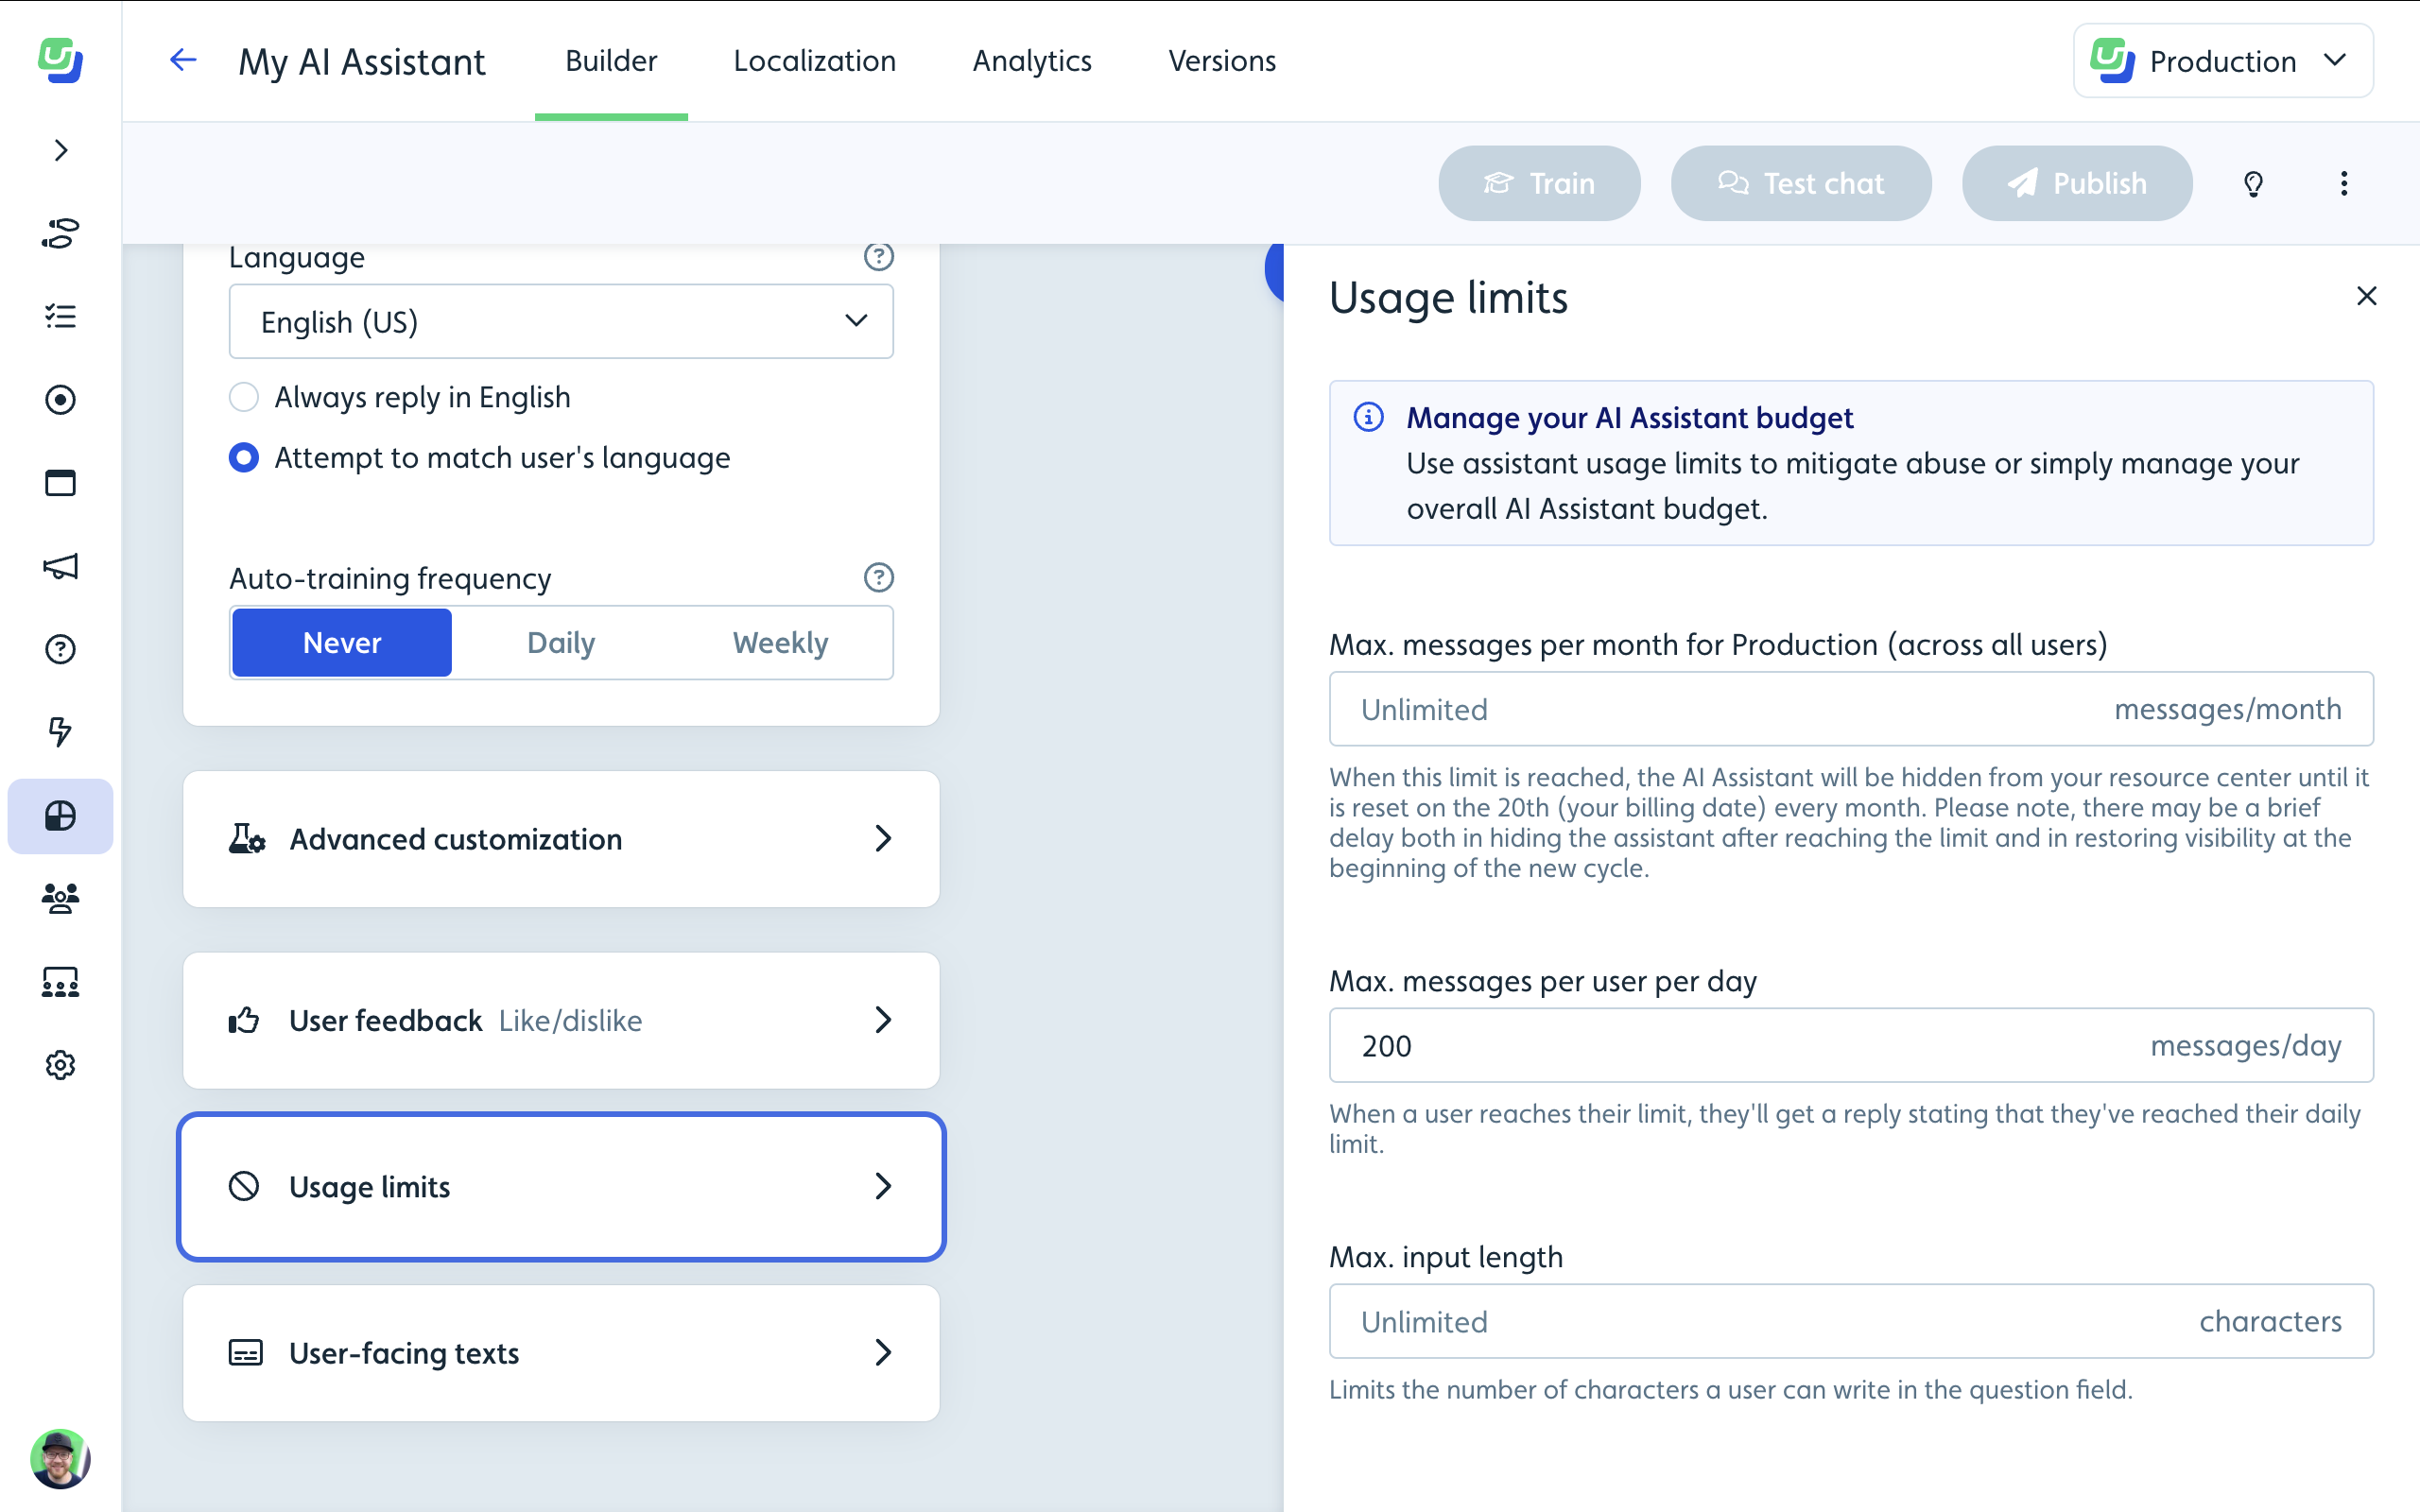
Creating, training, and publishing an assistant
AI Assistants are created, managed, and published in a similar manner to other Userflow content, such as flows and checklists. However, they also require training before publishing.
To create your first assistant:
Go to AI Assistants in the sidebar.
Click Create assistant.
Give it a name and click the Create button.
You’ll now see the assistant builder:
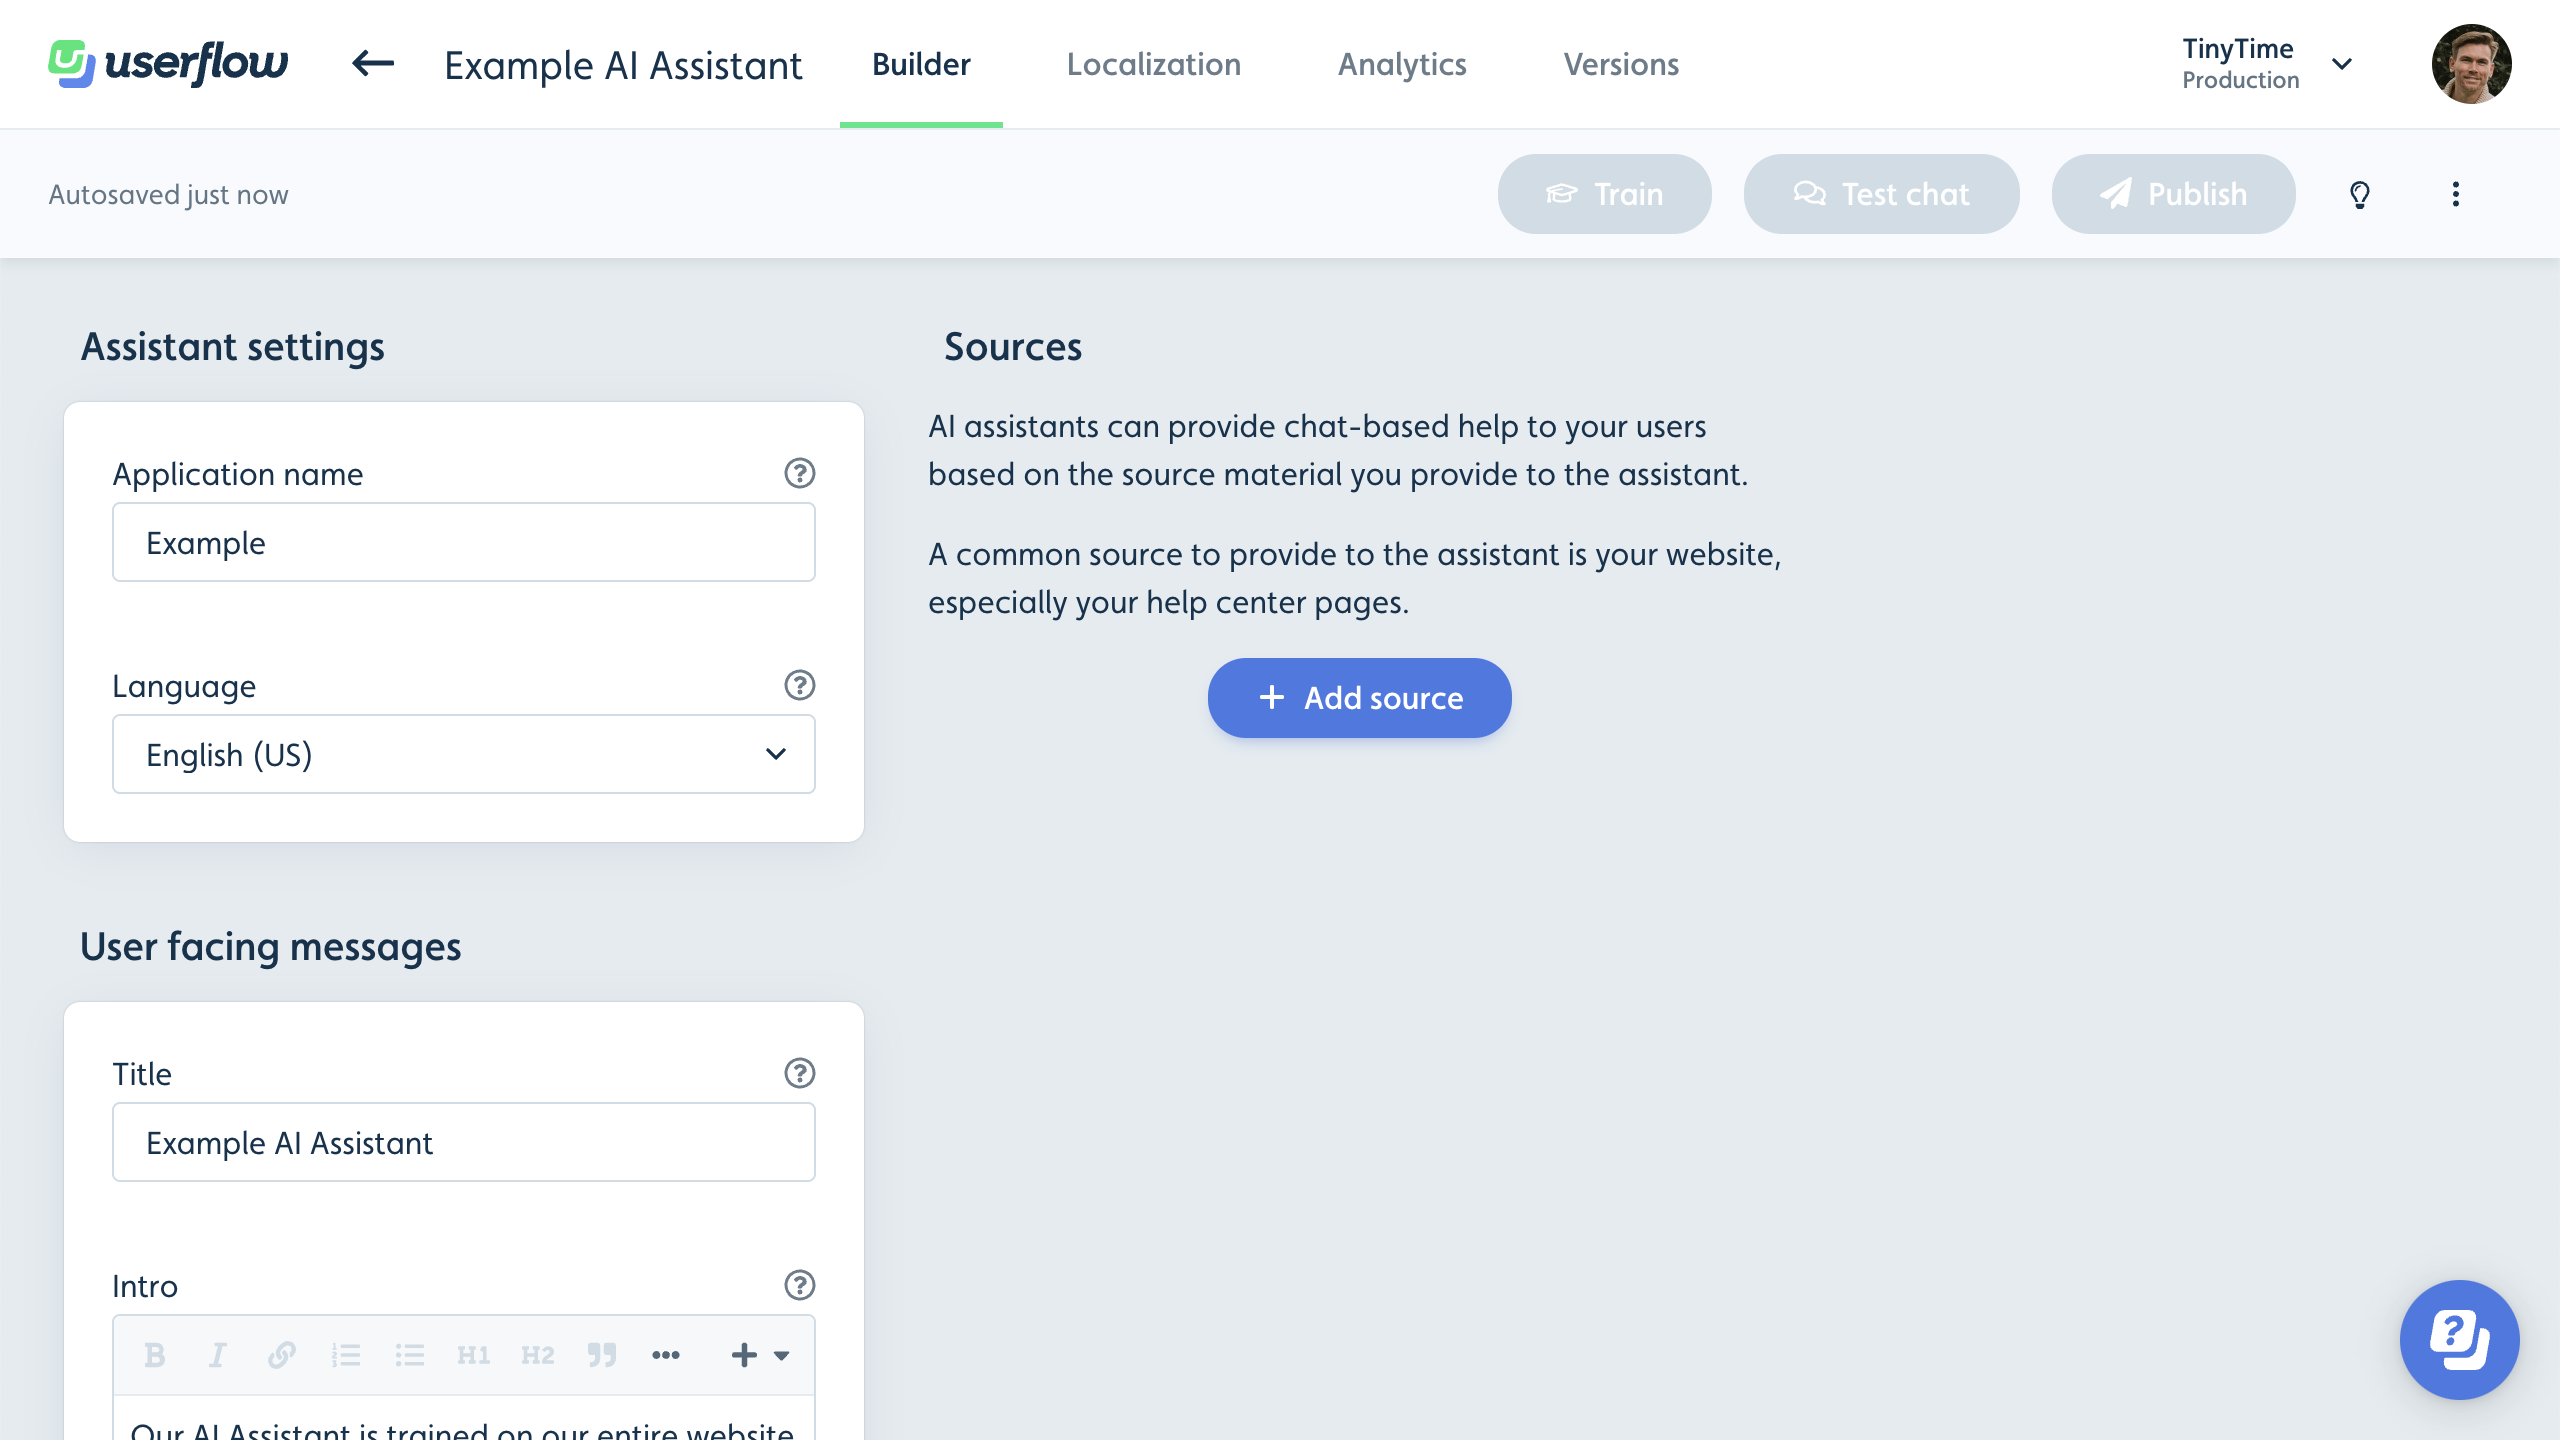
Click Add source and choose a source type. It’s easiest to start with a Web crawler source, which starts at a specified URL (e.g., your website’s homepage) and follows all links, storing their content. Learn more about Web crawler and other sources below.
Once you’ve added at least one source, click the Train button. Userflow will fetch all source information and train the assistant. Depending on the size of your website, this may take anywhere from a few seconds to a few minutes. Click the x documents link in the header to track progress.
After training is complete, try clicking Test chat in the header. You can now ask your assistant questions and receive answers! Test follow-up questions as well.
You can refine your source settings if desired. Common adjustments include:
Preventing the Web crawler from visiting certain pages. If your site has a lengthy list of irrelevant pages under a specific path, enable Control URLs to visit and enter the URL pattern under Do not store URLs matching. This will both speed up training and improve your assistant by minimizing the risk of using irrelevant information.
Filtering text from each page to store. For example, remove the header, footer, or menus. The assistant will provide better answers if the content excludes irrelevant text. Filter content using the Only include HTML matching CSS selector and Exclude HTML matching CSS selector settings. Check the x documents link and click a URL in the list to see the text stored by Userflow. Read more about this under Web crawler.
You can also add multiple sources if you have content on different domains, such as yourdomain.com and docs.yourdomain.com.
Whenever you change the assistant settings, you must click Train to update it.
Once satisfied with the assistant’s answers, click Publish. The assistant is now usable but not yet visible to users.
To display the assistant to users, add it to your resource center:
Go to Content.
Find your resource center in the list and click it. If you don’t have one yet, either create one or see Minimal resource center solution.
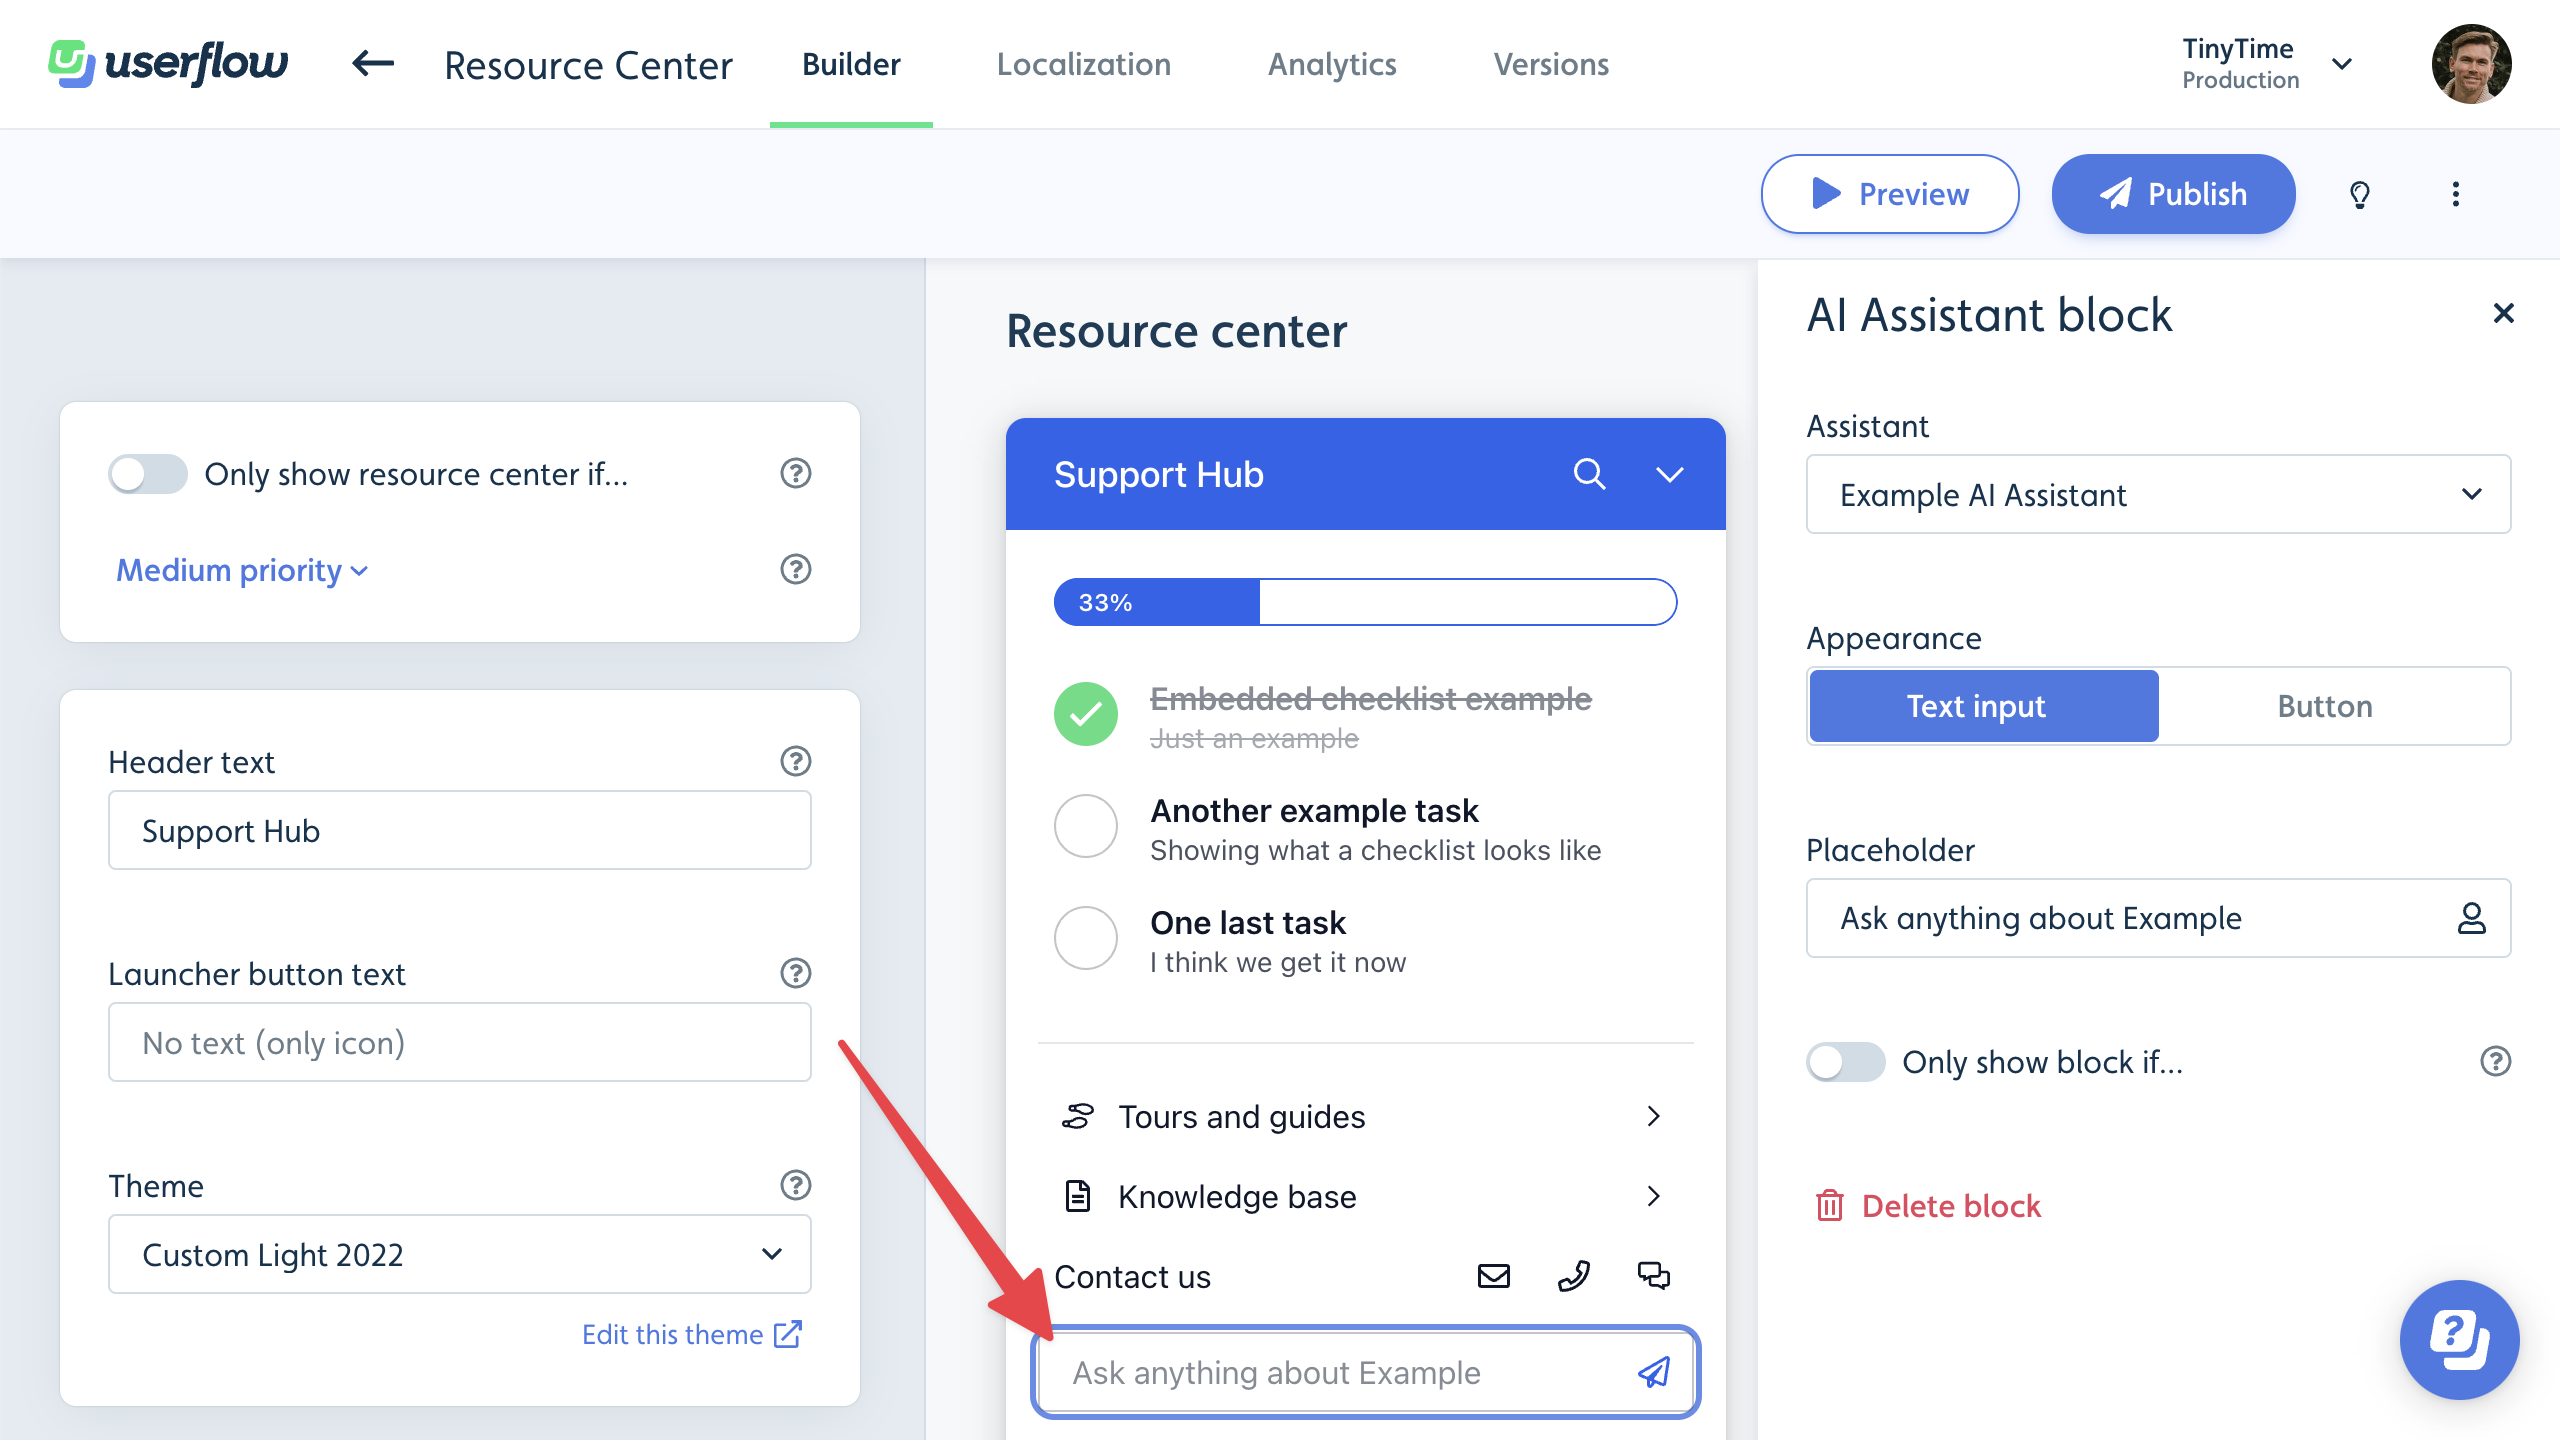
Click Add block → AI Assistant.
Select your assistant from the dropdown list in the side panel.
We recommend placing the AI Assistant block at the bottom of the list and using the Text input option under Appearance. This creates an eye-catching design that captures users’ attention when they open the resource center.
Click Preview to test the resource center with the assistant before publishing.
When ready, click Publish to make the assistant available for users.
Source types
We support various source types, each with distinct functionality.
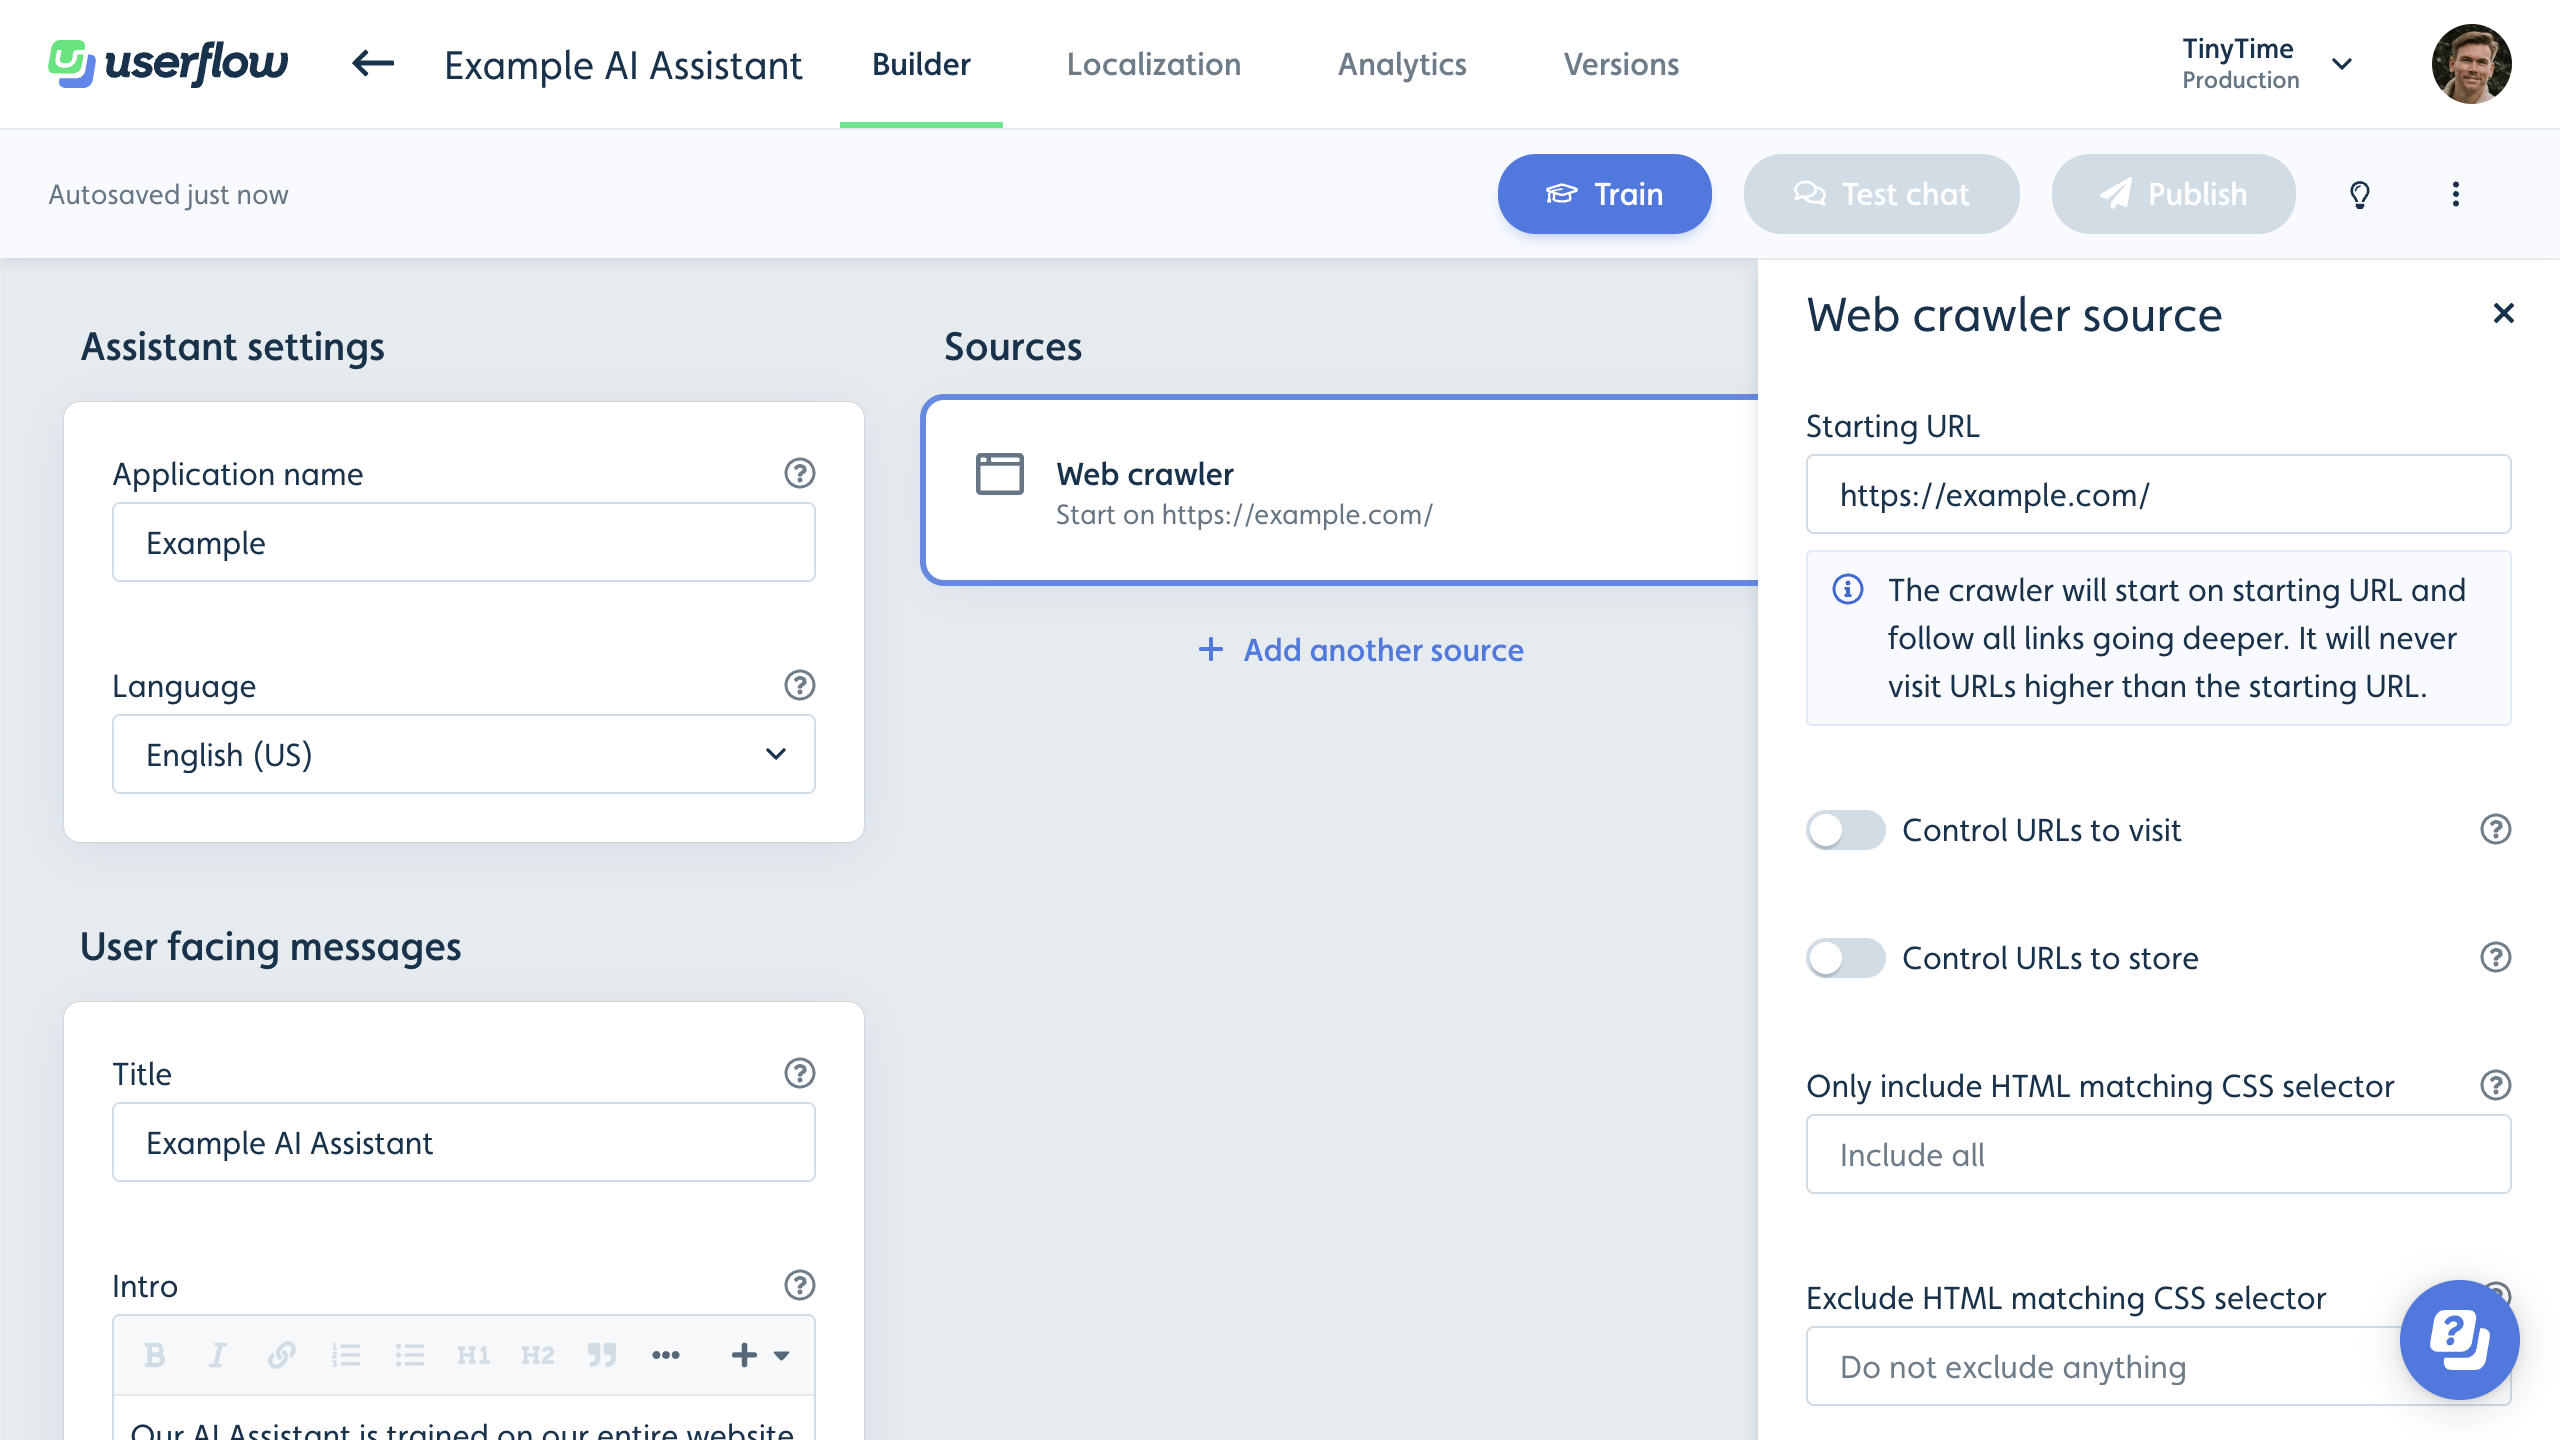
Web crawler
The Web crawler starts at the given Starting URL and recursively follows all links.
It will only follow links within the same path as the Starting URL. Examples: If your Starting URL is https://example.com/docs, it will read https://example.com/docs/page, https://example.com/docs/sub/page, and anything else under that path, but it will not read https://example.com/other-page since it’s not under the /docs prefix. It also won’t follow links to other domains.
To prevent the crawler from visiting certain pages, enable Control URLs to visit and add URL patterns to include or exclude. When a page is not visited, the crawler will not load it, meaning it won’t store its content or follow its links.
If you want the crawler to visit certain pages but not store them as source information, enable Control URLs to store. When a page is marked as not stored, the crawler will load it and follow its links, but not store its content. This feature is useful for following links from index-like pages without including their content. For example, on a blog, you want the crawler to visit /blog and /blog/page/:page to find all old blog posts, so you can’t use the Control URLs to visit feature.
The crawler will attempt to extract only the text bits from each page’s HTML content and transform it to Markdown, which helps the assistant understand headings, sections, code, and other formatting. It’s a good idea to remove all text that’s not the main content of the page. To do this, use the Only include HTML matching CSS selector and Exclude HTML matching CSS selector settings. Examples:
If your documentation site wraps the main content in an
<article>HTML tag, enterarticleunder Only include HTML matching CSS selector.If your website has
<header>and<footer>HTML elements on all pages containing the top and bottom menus, enterheader, footerunder Exclude HTML matching CSS selector.
After training the assistant, click the x documents link in the builder header and explore some of the URLs to ensure the text is clean and free of irrelevant content.
If your website uses JavaScript to dynamically fetch content and render it asynchronously, you may find that your pages’ content is empty. If this occurs, enable Render JavaScript. You can also enter a number of milliseconds to wait before capturing the content. Choose a duration you feel confident that your page will load within. If unsure, enter the maximum value of 10,000 (10 seconds), but note that higher values may slow down training.
If your website uses special proxies or captchas, you may not see any documents under x documents and may encounter error messages in the Training log. If this happens, try enabling Captcha/proxy work-around. If the issue persists, contact Userflow support for assistance.
Note that Userflow caches your web pages for up to one week. This speeds up retraining, as it only needs to reevaluate your URL patterns, CSS selectors, etc., without waiting for your website to respond with the full HTML. If your website content has changed, click the Clear cache and train button under the top-right three-dot menu in the builder.
Text
The Text source is beneficial for providing the assistant with information that you prefer not to display directly on your website.
For instance, during the early-access phase of our AI Assistant feature, this public guide was unavailable. However, we still wanted to offer helpful information to customers inquiring about getting an assistant of their own. To achieve this, we added the following text in a Text source:
Users can get a Userflow AI Assistant of their own by contacting us via the HUMAN live-chat. We maintain a waitlist and will extend invitations soon.
Salesforce
The Salesforce source loads your Knowledge Base articles directly via the Salesforce API. It works even if your help center requires user authentication. You can easily filter which data categories you want to include.
How to set up:
Connect to Salesforce under Settings → Integrations.
Fill in your Article URL template under Salesforce Knowledge Base settings. This is how the assistant will know how to link to your articles. Example:
https://help.mysite.com/s/article/{{ article.urlName }}. If you don’t fill this field in, articles’ content will be used for answering, but the assistant will not provide any source links.Optional: By default, we’ll use the content of your articles’ Title, Question and Answer fields from Salesforce. If you’re using a different format for your articles, you can use a custom Article content template. If your articles have a custom field called,
CustomText__c, then you can use it like this:{{ layout_items.CustomText__c }}.Salesforce will now appear under the Add source button in the assistant builder.
Zendesk
The Zendesk source loads your help center articles directly via the Zendesk API. It works even if your help center requires user authentication. You can easily filter which categories/sections you want to include.
First, connect to Zendesk under Settings → Integrations. After that, Zendesk will appear in the Add source button under the assistant builder.
Intercom
The Intercom source loads your help center articles directly via the Intercom API. It works even if your help center requires user authentication. You can easily filter which categories/sections you want to include.
First, connect to Intercom under Settings → Integrations. After that, Intercom will appear in the Add source button under the assistant builder.
Advanced Customization
Advanced customization enables you to provide tailored instructions to the AI assistant, grant it constant access to specific knowledge, and influence the selection of relevant source content.
This feature is powerful but also carries risks: altering these settings can significantly improve your assistant’s performance or potentially impair it. We strongly recommend rigorously testing any changes and encourage you to consult with us for guidance on utilizing this feature.
Advanced customization is exclusively available on our Pro and Enterprise plans.
Below is a brief overview of the three settings, followed by more detailed explanations:
Custom instructions: Directs the assistant to modify its behavior. Think of these as commands or requests.
Persistent knowledge: Essential information that the assistant should always have access to, regardless of the user’s input.
Source relevance keywords: Affects the relevance of source content, personalized for each user.
Each setting uses a Liquid template, which supports user attributes for personalized instructions. We advise against including any Personally Identifiable Information (PII) in these fields (as they are sent to OpenAI). You can use English or any other language in all three fields - the assistant understands both.
Custom instructions
This field contains instructions that alter the assistant’s behavior. Do not use it to provide information; use Persistent knowledge for that purpose.
Consider this field as communication to the assistant. You may address the assistant as “you”.
For instance, imagine you have an accounting software with mixed documentation for Corporations and Sole Proprietorships. Rules differ depending on the user’s company type, and you want the assistant to provide appropriate information accordingly. If you have a user attribute called company_type, you can use the following example:
Another example involves users with varying technical expertise. Technical users may prefer API and code solutions, while non-technical users might lean toward UI-based solutions. If you have a user attribute called technical_level set to either low or high, use the example below:
Multiple instructions can be combined in the same field. Ensure all user attribute combinations are tested.
Persistent knowledge
This field contains information that the assistant should always have access to, regardless of the user’s input. Your entire knowledge base is too large to send with every message, so we employ smart techniques to send only the most relevant information. Not all regular source content is transmitted to the assistant with each message.
Do not use this field for specific instructions (use Custom instructions instead), as the assistant will not act on them. The content here is treated like your website’s content, with the only difference being its constant availability to the assistant, irrespective of user input.
Refer to the user as “the user” in the text. The assistant knows there is a user and that its replies are intended for them (although it doesn’t know the user’s identity).
Here’s an example where the assistant receives information about the user and their company. In this case, we’re using our Companies feature to include attributes at the user level, company level (called group), and company membership level (called group_membership).
The assistant can now combine this knowledge with other information related to the user’s query to provide more accurate answers.
For example, if your documentation states that a specific feature X is only available on the “Pro” plan and the assistant is informed that the user’s plan is “Basic,” then when a user asks, “Why can’t I see feature X?”, the assistant can intelligently answer that it’s because the user is not on the “Pro” plan.
Source relevance keywords
As mentioned earlier, we use smart techniques to determine the most relevant source content to send to the assistant with each message. This field enables you to influence the relevance of source content, which is personalized for each user.
Keep this field short and free of unnecessary words. Ideally, include just 1-5 comma-separated keywords.
Returning to our accounting software example, if a user asks “How do I do X?” and your documentation contains instructions for performing X both as a Corporation and as a Sole Proprietorship, simply adding the company_type attribute to this field will increase the likelihood of selecting the correct documentation.
Example field value:
Liquid Template and User/Company Attributes
Each advanced customization settings field utilizes a Liquid template.
Add user/company attributes by enclosing them in double curly braces. User attributes are nested under user., company attributes under group., and company membership attributes under group_membership.. The term “group” is used here because it is the technical term we use for companies, just as you call userflow.group(companyId) in Userflow.js to associate a user with a company/group.
Example:
With Liquid, you can use control flows such as if/case, iterate through lists, format strings, and more. Refer to the Liquid documentation for additional information.
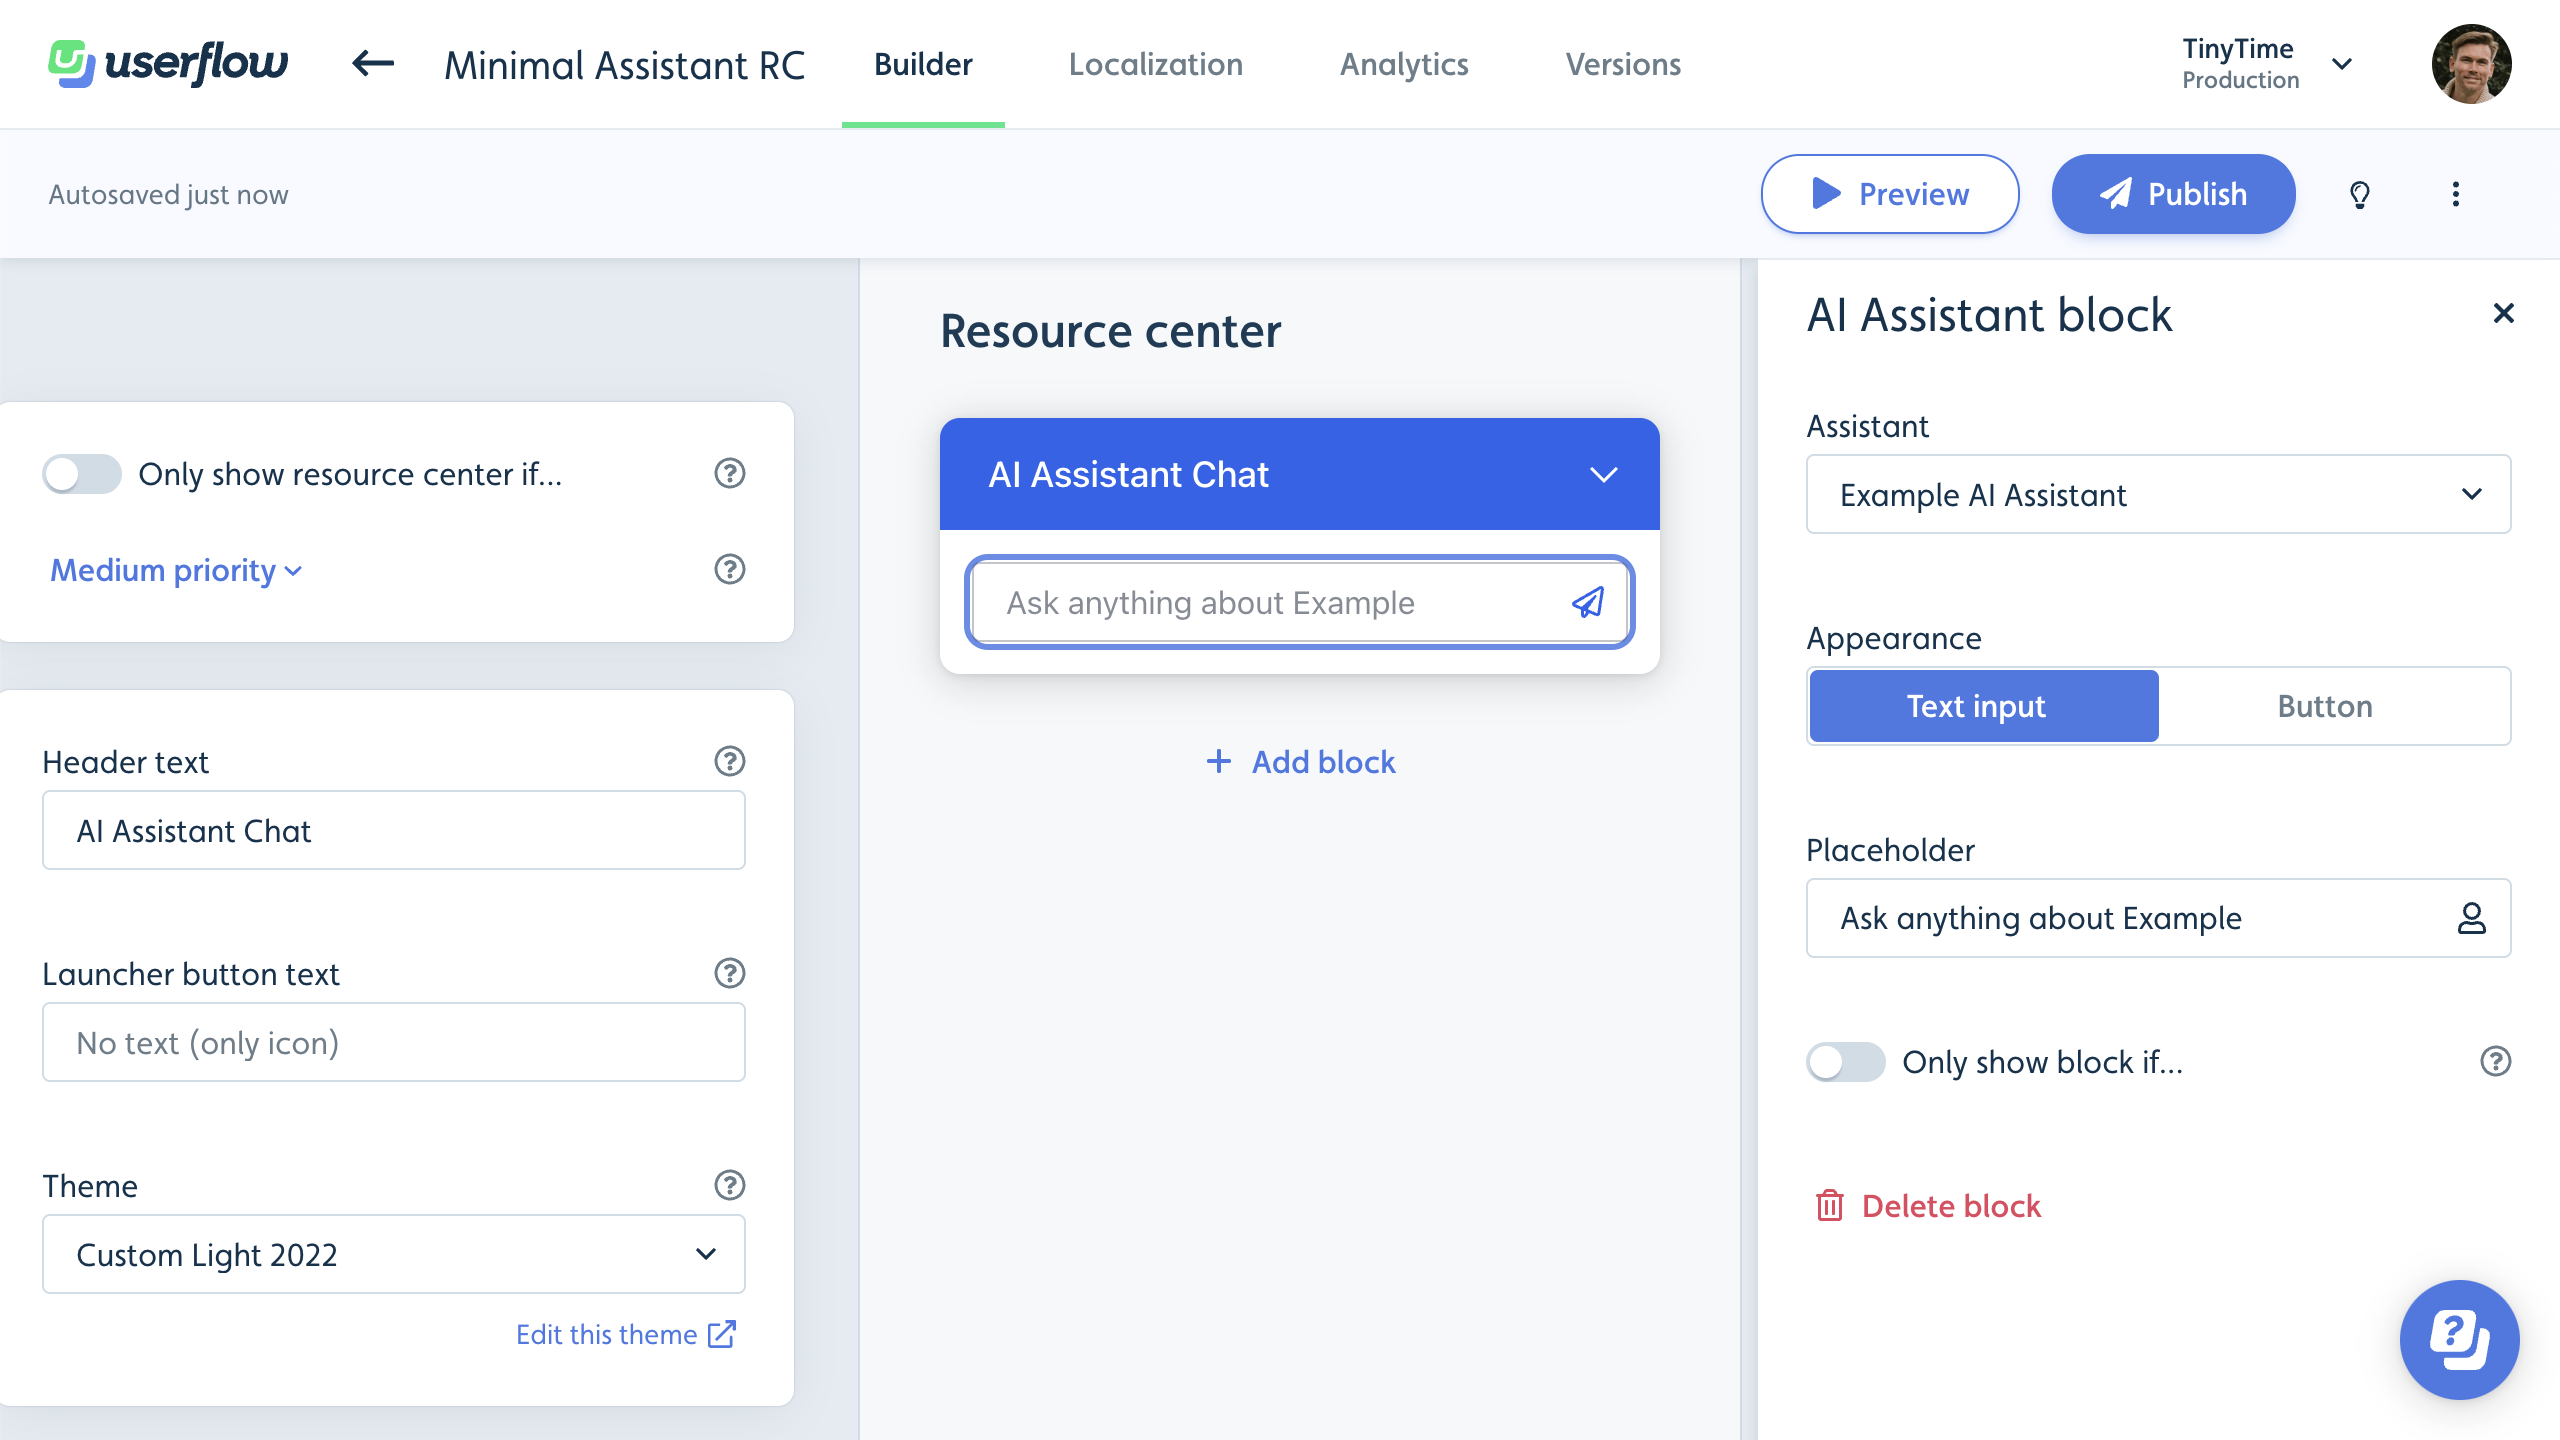
Minimal resource center solution
If you are not utilizing the full resource center but wish to implement the AI Assistant in your app, you can create a new resource center containing only a single AI Assistant block.
Next, have your developers disable the default resource center launcher by adding the following line before your userflow.init() call. This will prevent the round Userflow help button from appearing in the corner of your app:
Afterward, click Publish in the resource center builder. As the default launcher is hidden, nothing will be displayed to users.
Finally, request your developers to open the assistant chat programmatically, such as when users click a custom button in your app:
An example of an event handler on a button:
In the future, we anticipate offering more options for directly embedding the assistant in your app or hosting it on a separate URL.
Localization
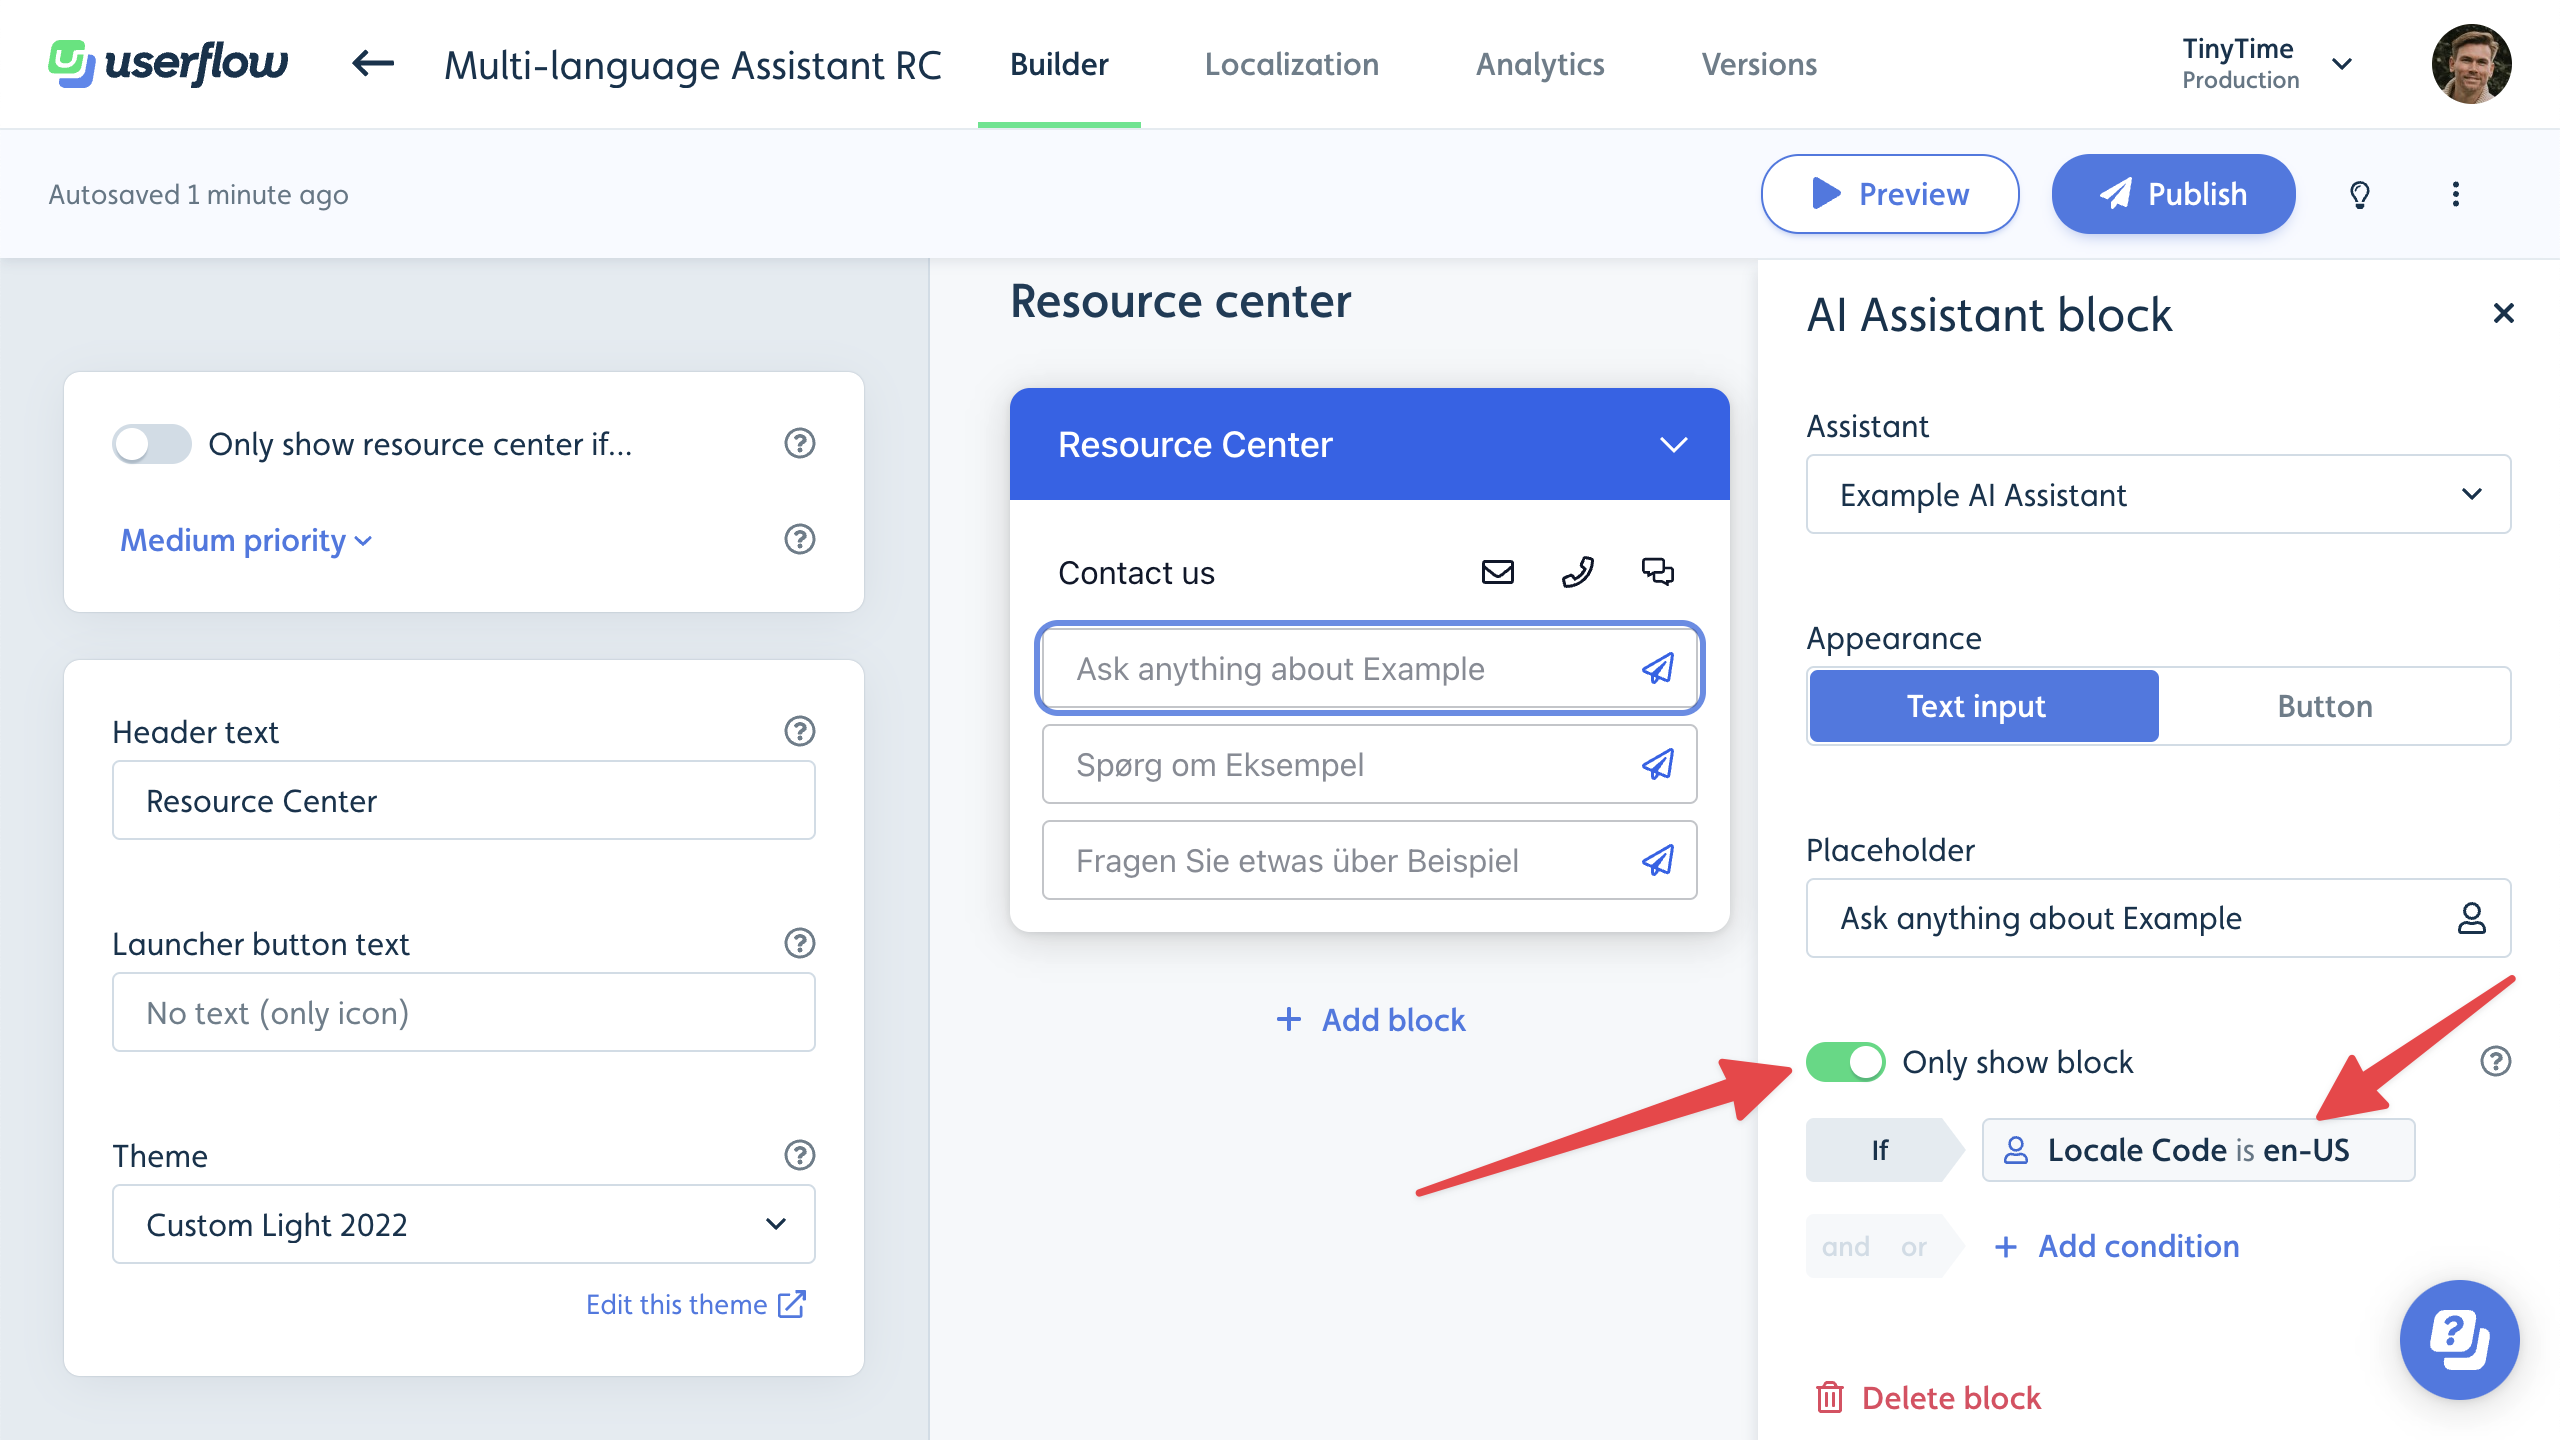
Assistants are designed to work in a single language. However, you can create multiple assistants in various languages and incorporate them into your resource center.
Start by creating a separate assistant for each language. You can select the language in the assistant builder. Ensure each assistant is trained and published.
Then, in your resource center, add an AI Assistant block for each language. Choose the appropriate assistant for each block. Enable Only show block if and include an Attribute condition. Select the Locale Code attribute and set it to match the correct locale code.
User ratings and feedback
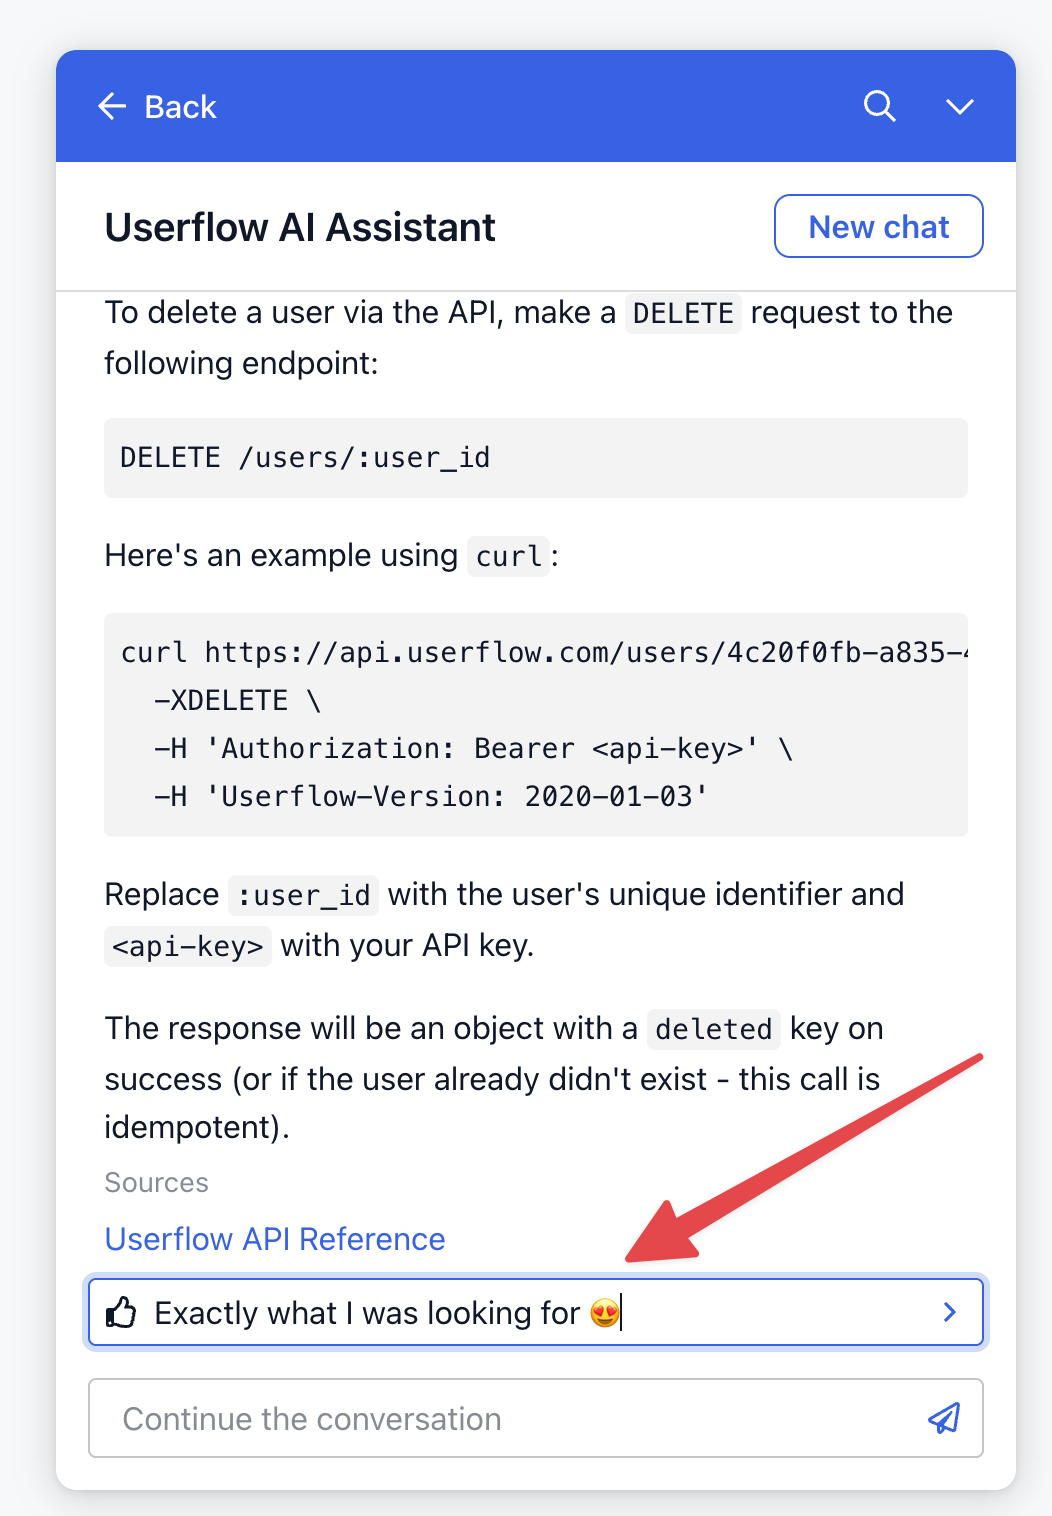
Users can rate the assistant’s replies using the thumbs-up and thumbs-down icons located below each response.
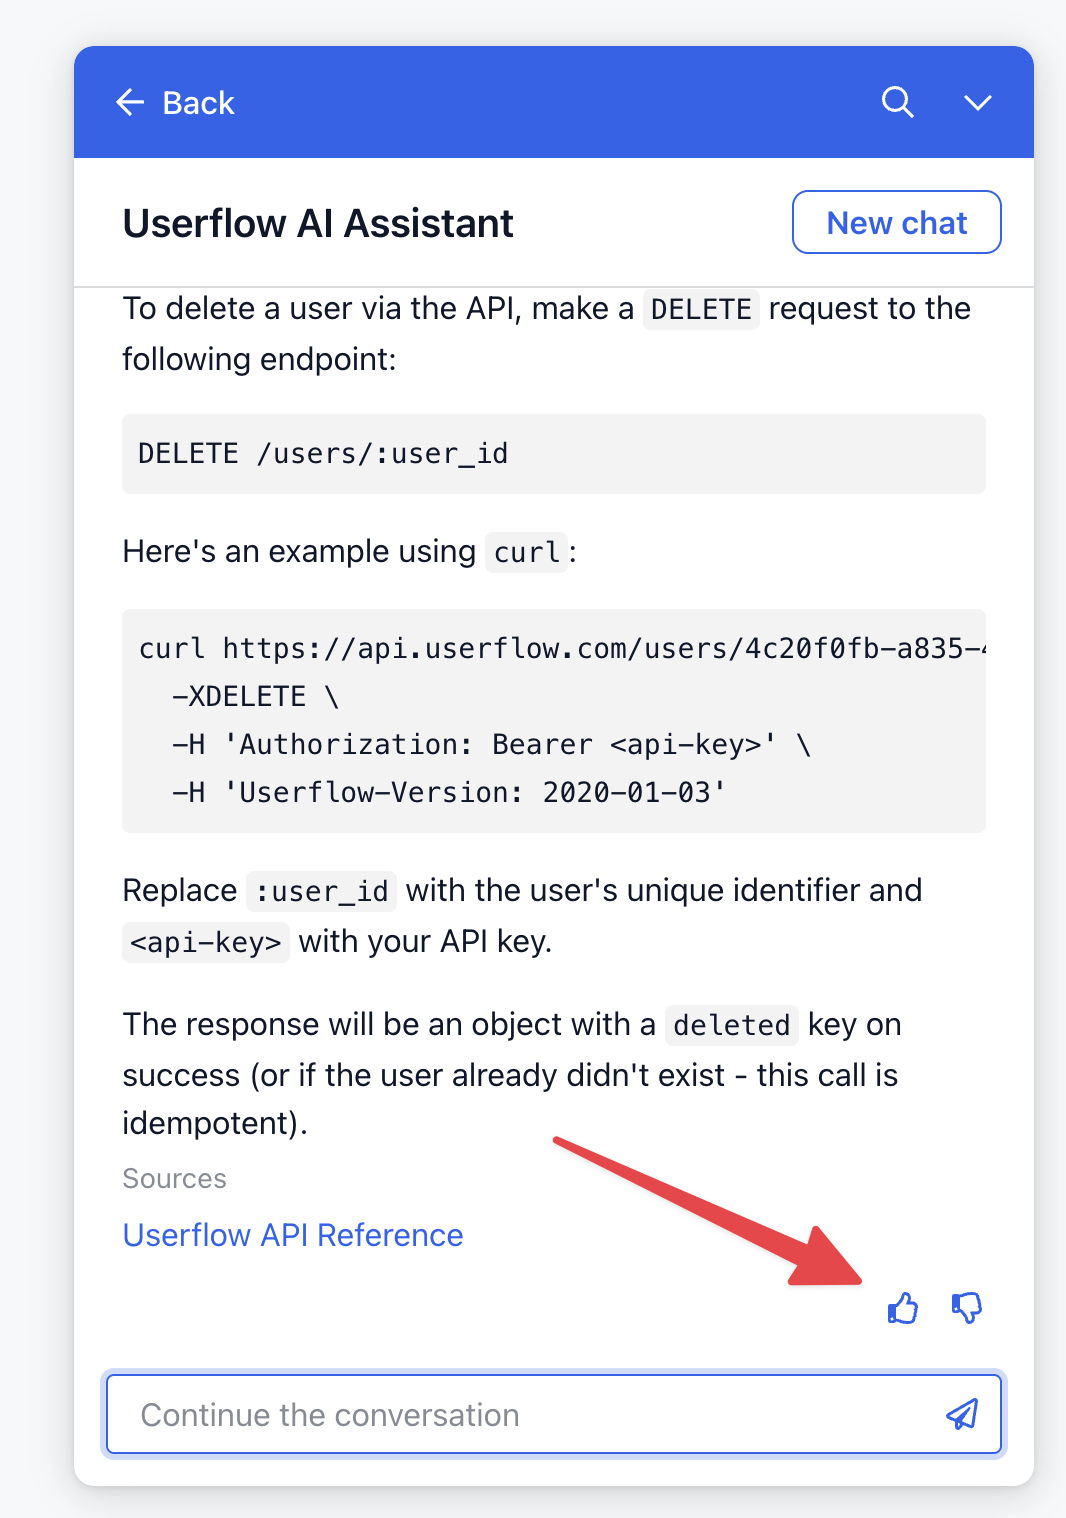
Upon liking or disliking a reply, users can provide additional feedback in a free-form text field.
You can view both the ratings and the feedback on the assistant’s Analytics tab.
Analytics
The Analytics tab is located next to the Builder tab.
This tab includes a chart displaying the number of messages, likes, and dislikes.

Additionally, it lists all the conversations the assistant has had with users. Click a conversation to view each message, including ratings and feedback messages. AI conversations can also be exported to CSV by clicking the Export button next to the conversations.
